I've finally finished it! After 5 months of modelling in 3DsMax, 3D printing, painting, glossing and weighting, the project I have been working on is done.
The beginning
My boyfriend Chris' birthday was coming up, I knew I wanted to do some more 3D printing and that I liked the idea of 3D printing gifts. This idea stuck firmly in my mind, Chris would love it being such an avid Star Wars fan. We occasionally play chess together and this seemed like a good way to blend these loves together into an awesome birthday present.
I started off by scribbling down some ideas; what characters should I use? What shape and style should the pieces be? How do I make sure they look like a set? What am I going to do about a board? I planned everything I could think of and bought things I would need. I doodled some ideas, made lists and discussed thoughts with friends. Very quickly I developed a strong image of the final outcome in my mind, and soon I was able to start putting the plan into action.
I started off by scribbling down some ideas; what characters should I use? What shape and style should the pieces be? How do I make sure they look like a set? What am I going to do about a board? I planned everything I could think of and bought things I would need. I doodled some ideas, made lists and discussed thoughts with friends. Very quickly I developed a strong image of the final outcome in my mind, and soon I was able to start putting the plan into action.
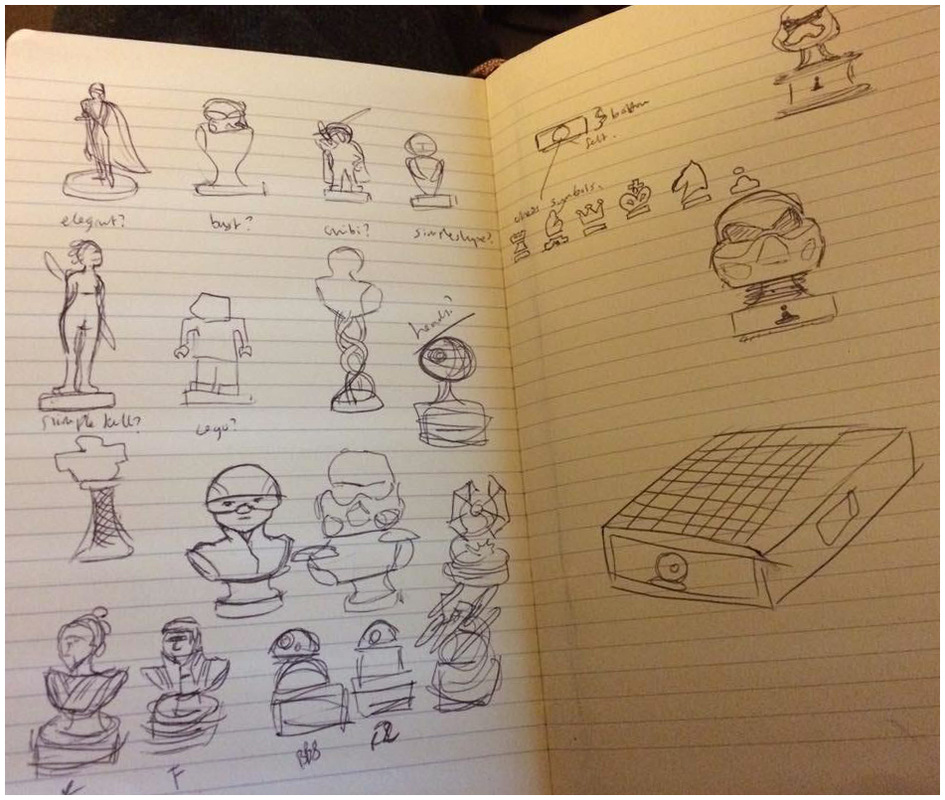
Early chess piece scribbles
The chess board (or battlefield, whichever way you look at it)
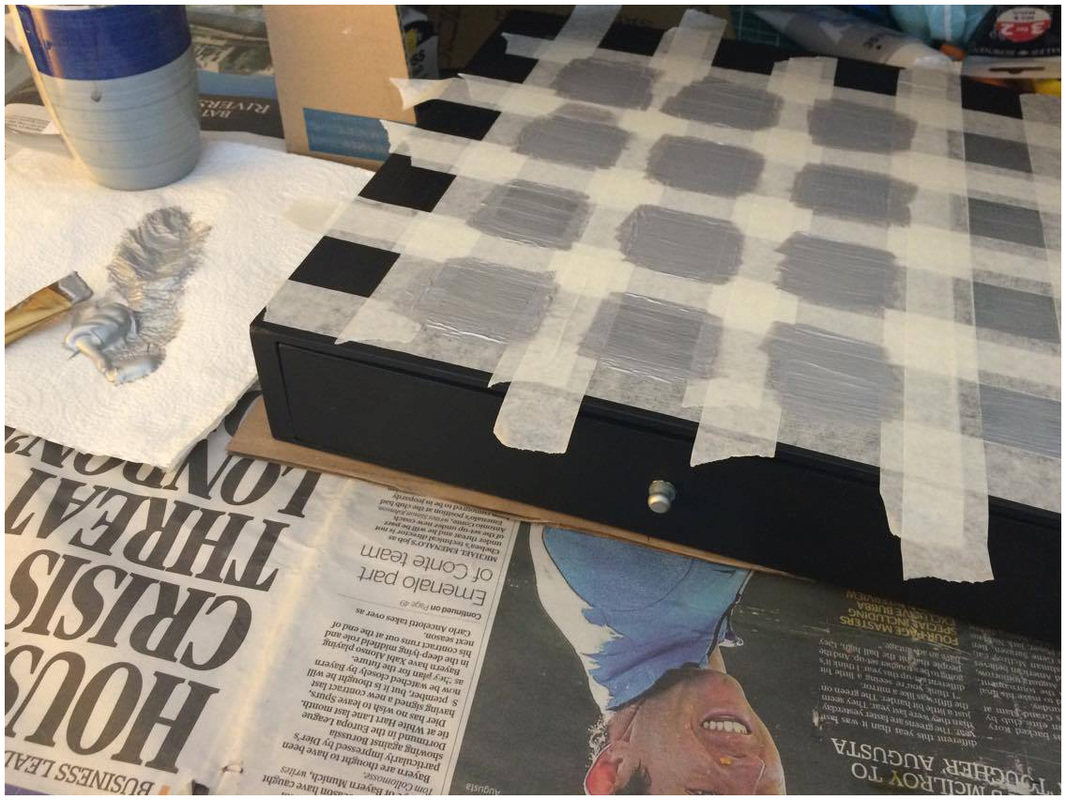
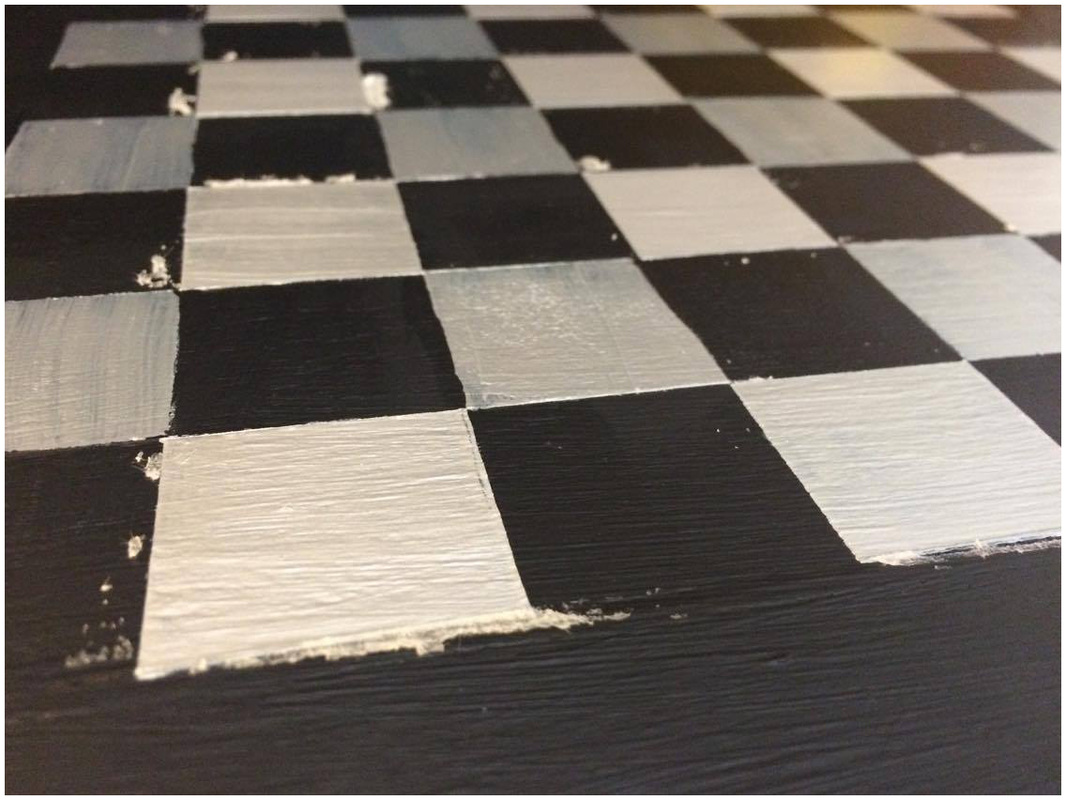
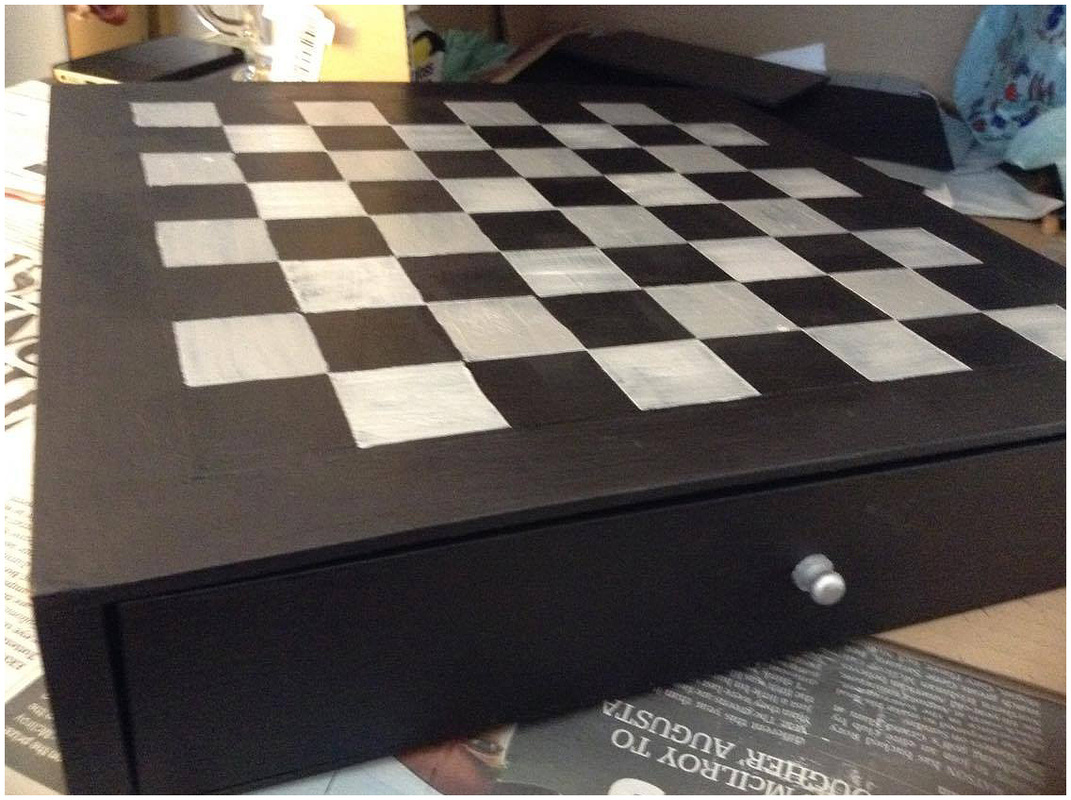
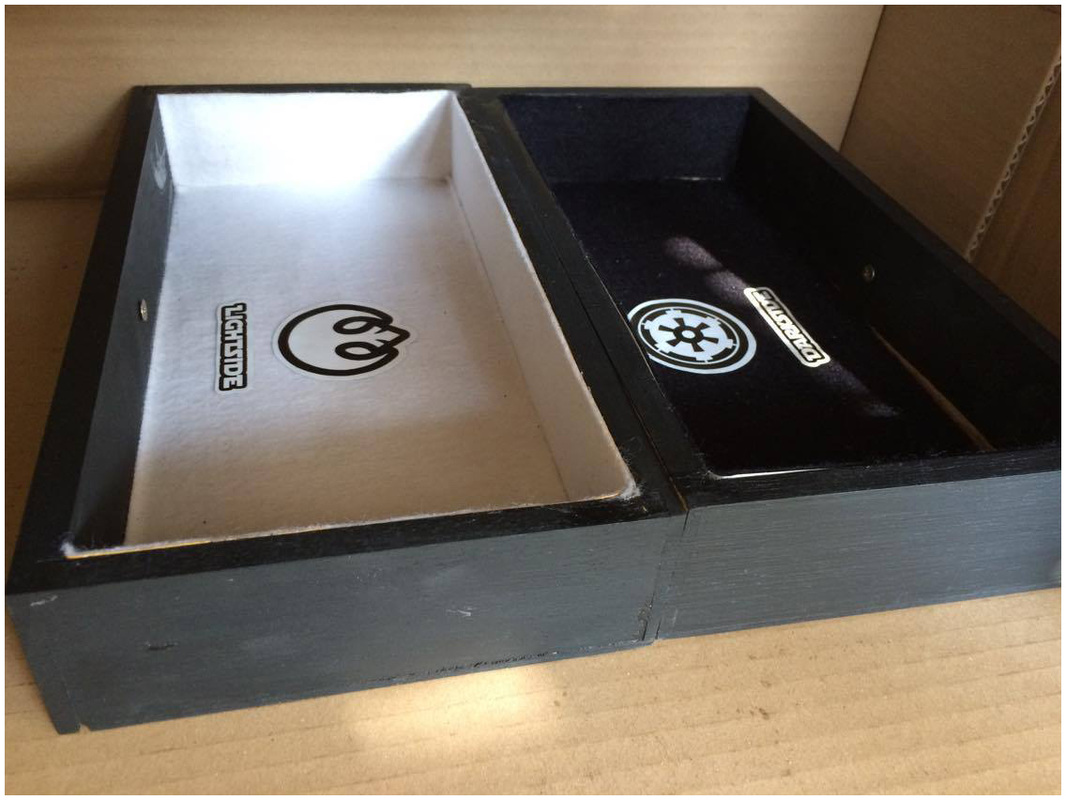
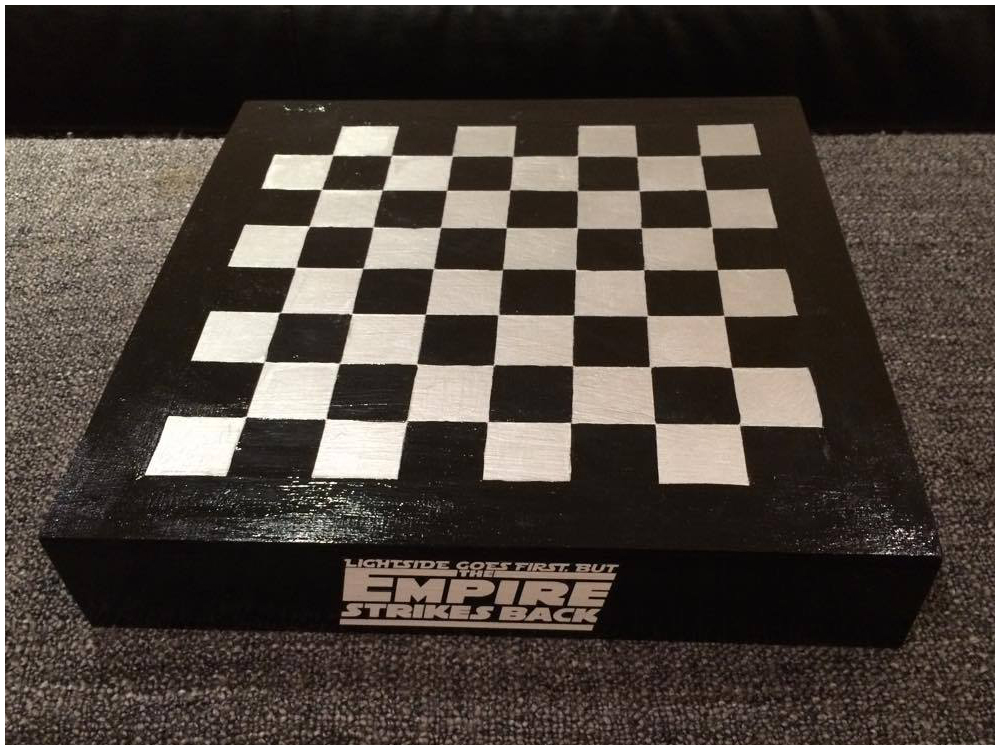
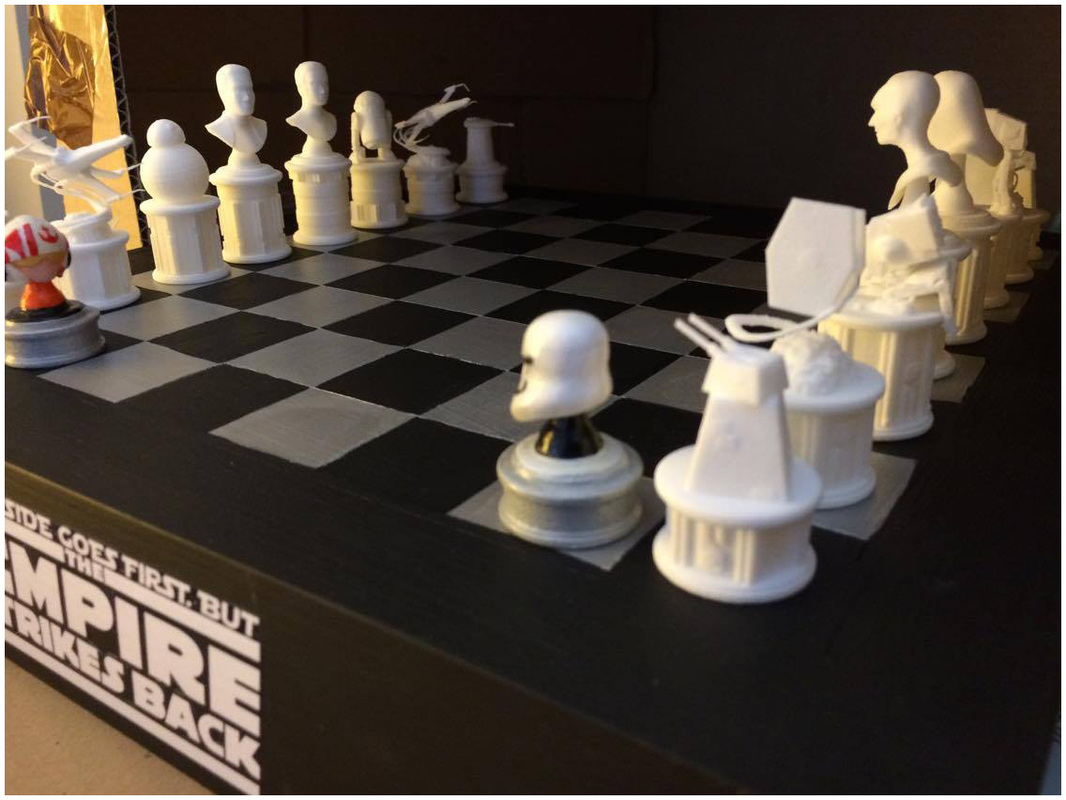
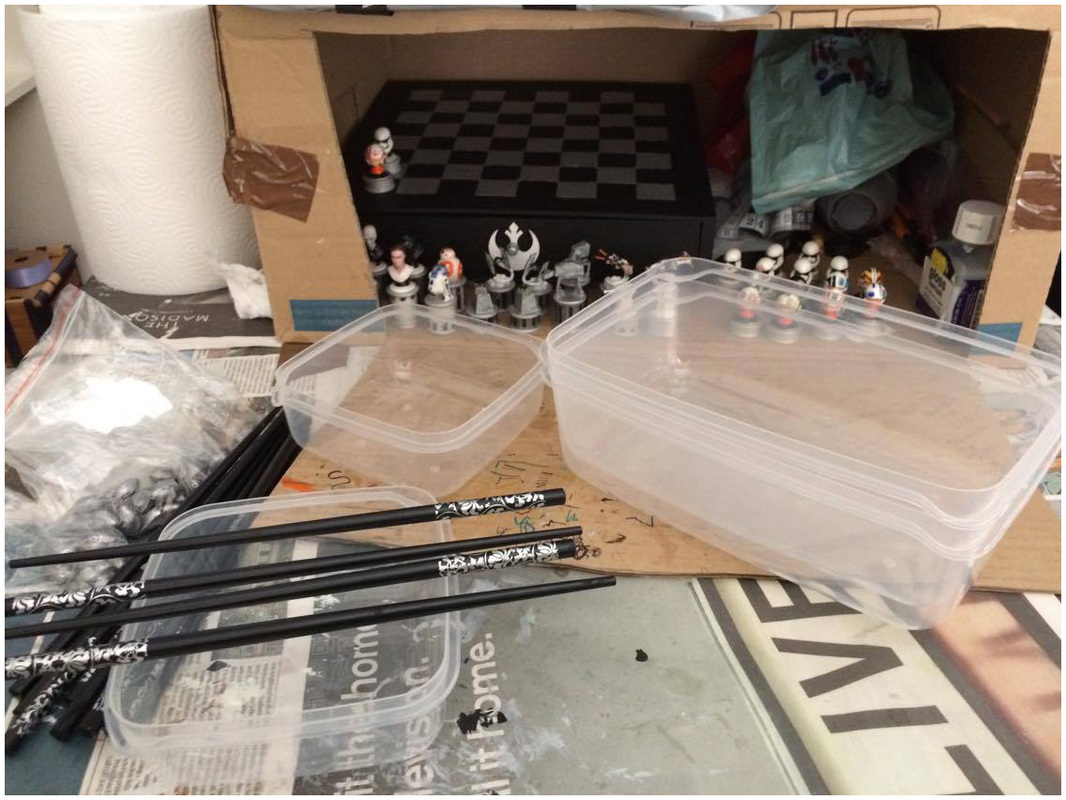
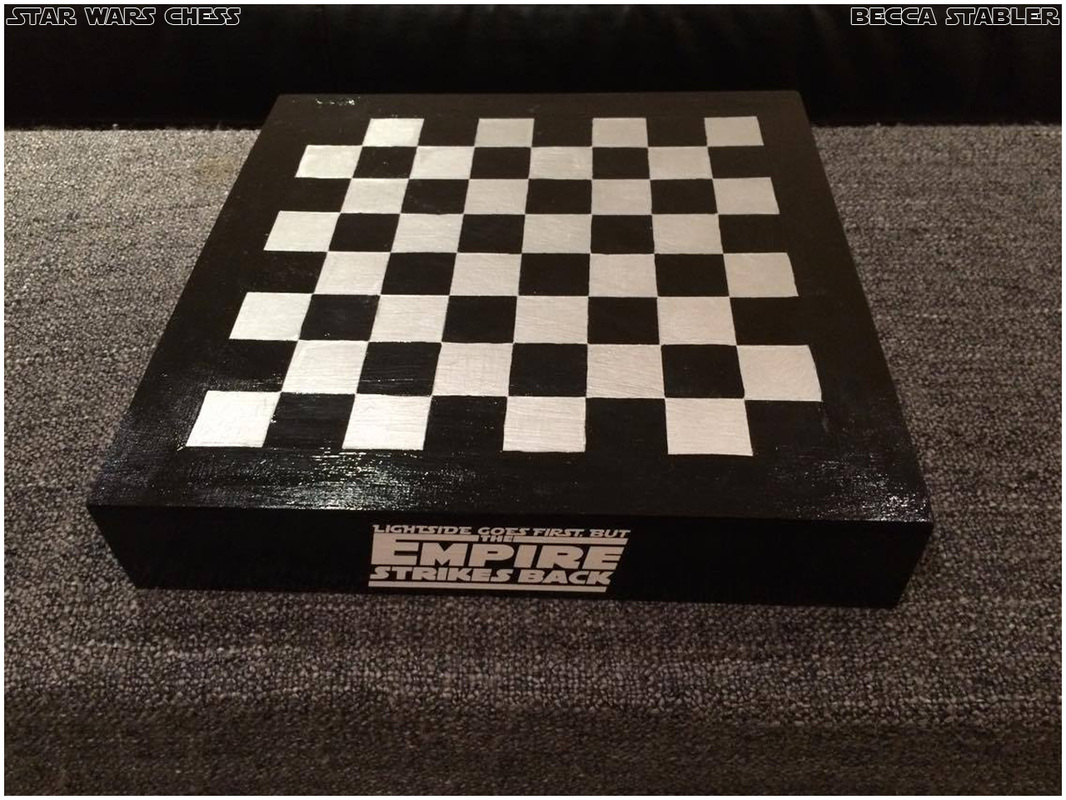
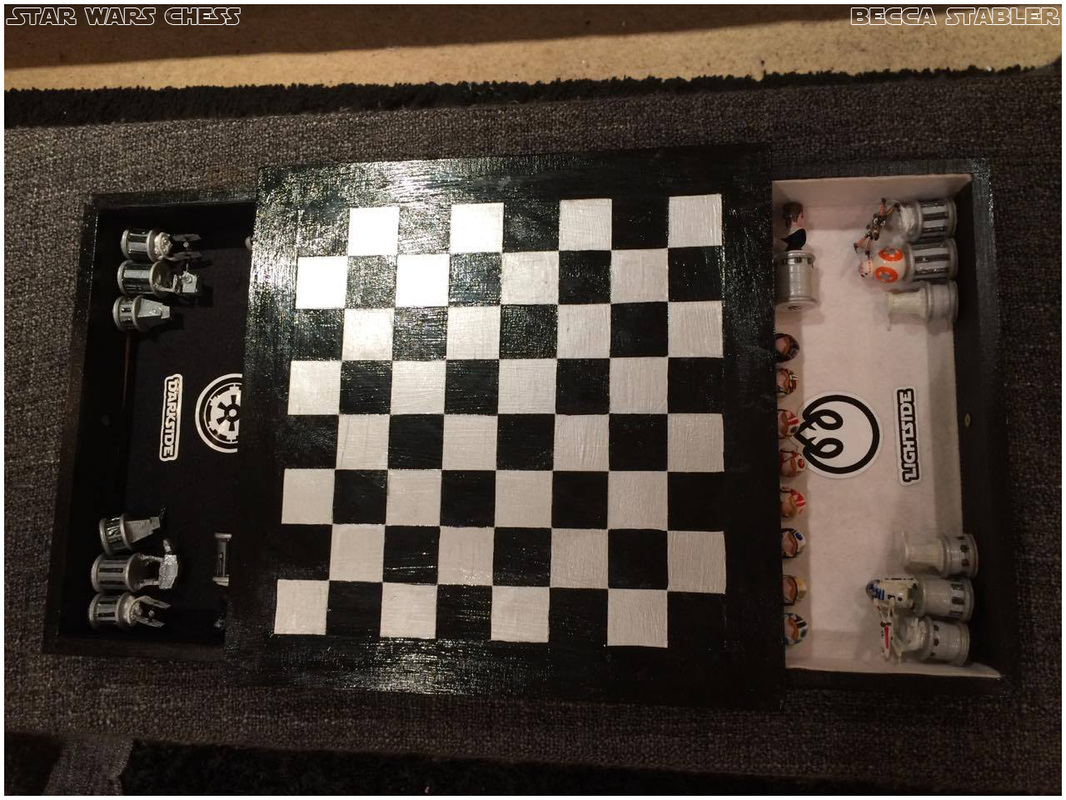
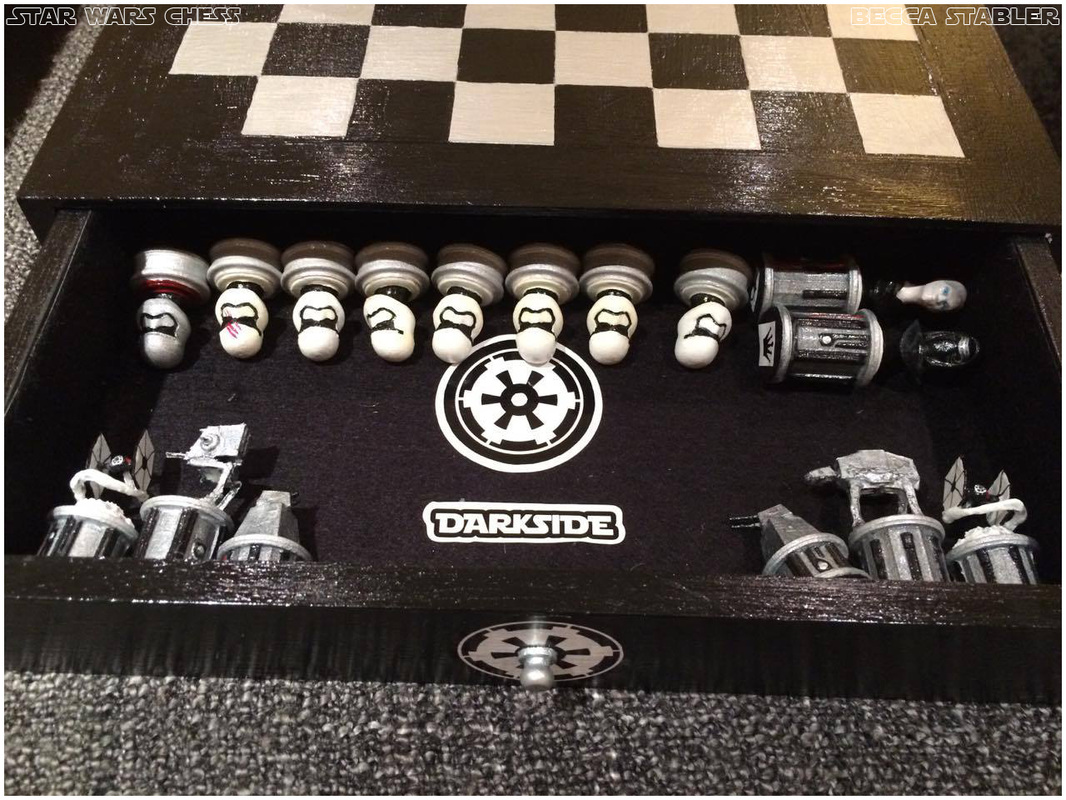
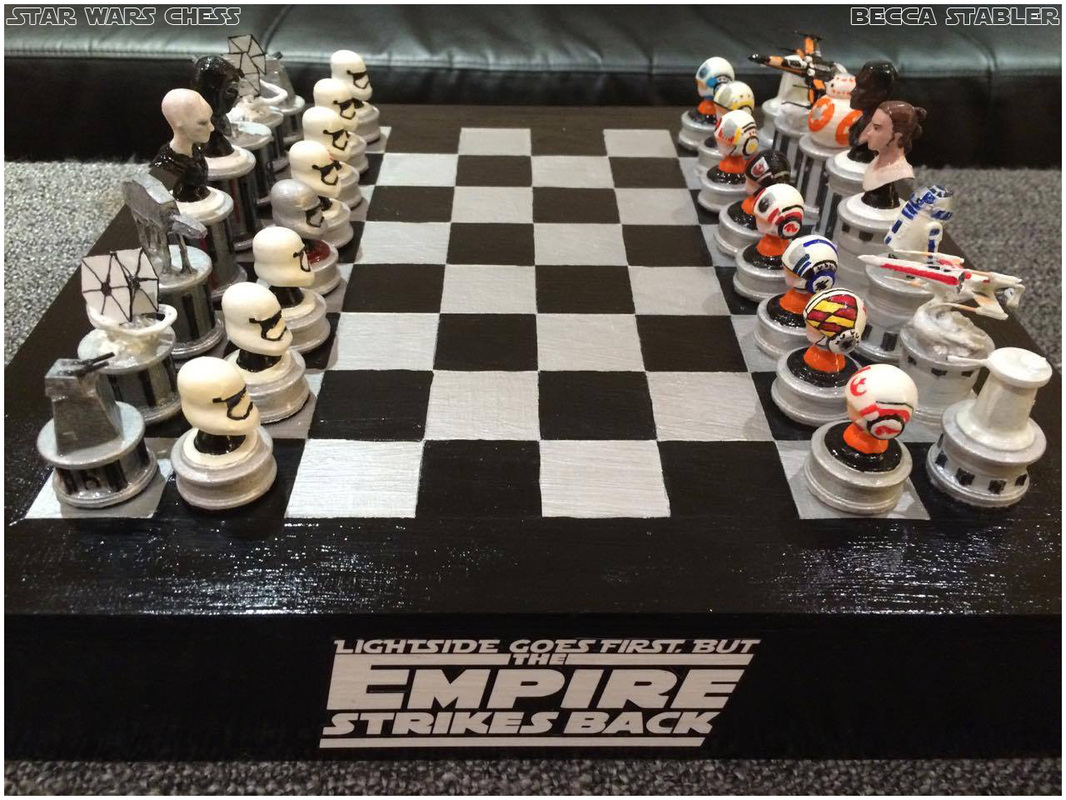
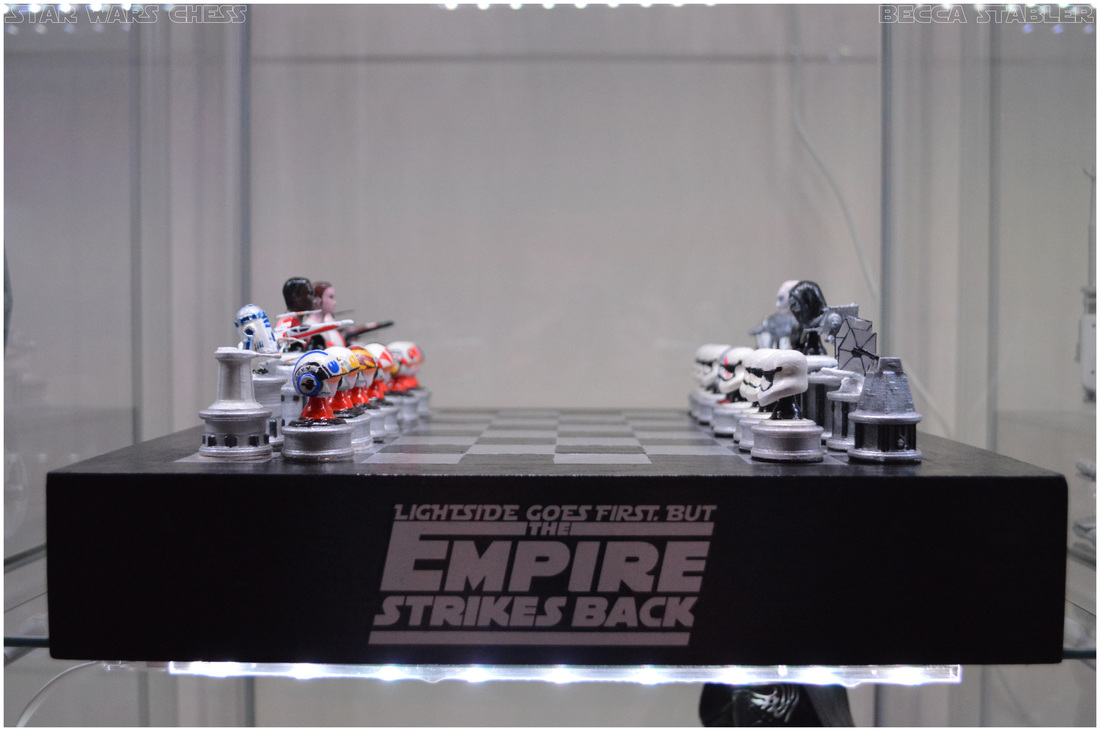
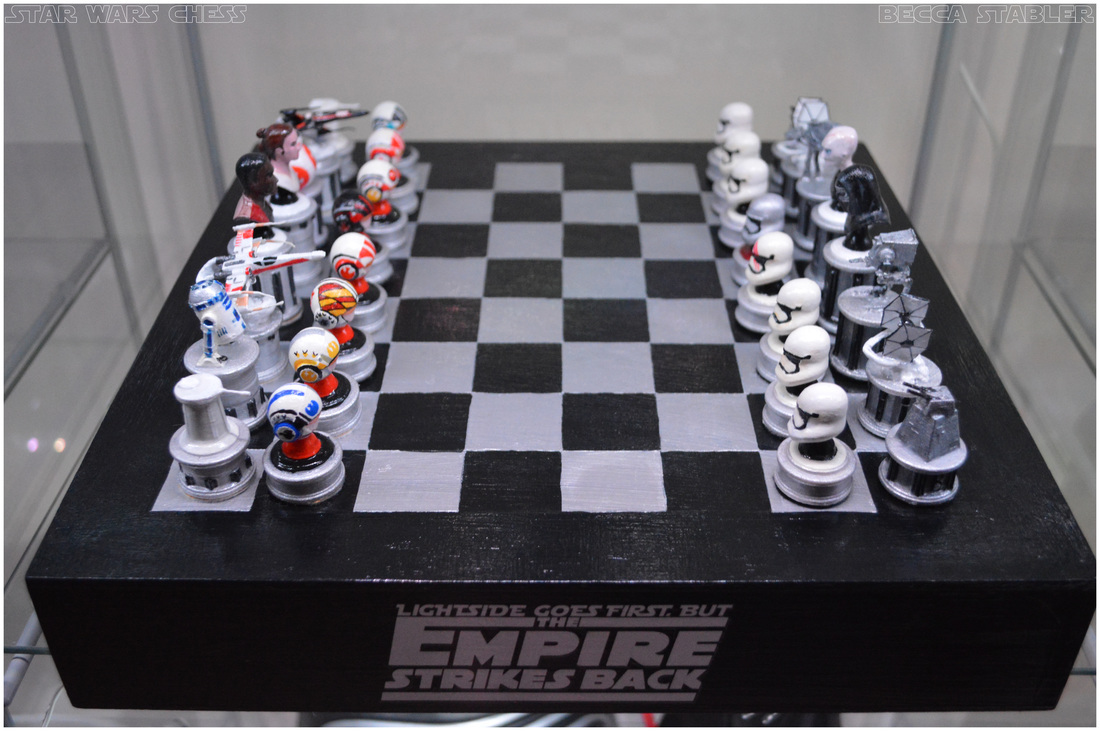
The chess board was originally bought online, and consisted of a square box that had a drawer on opposite sides for the pieces. It came with some wooden draughts and chess pieces which I discarded when it arrived. It was made of thin plywood as far as I could tell, with light and dark shades of wood to make out the board squares. I painted it with two coats of black acrylic paint and made template squares using masking tape. I painted silver acrylic over these for the lighter squares, leaving the black ones as they were. This had to have about three coats so the black wouldn't show through.
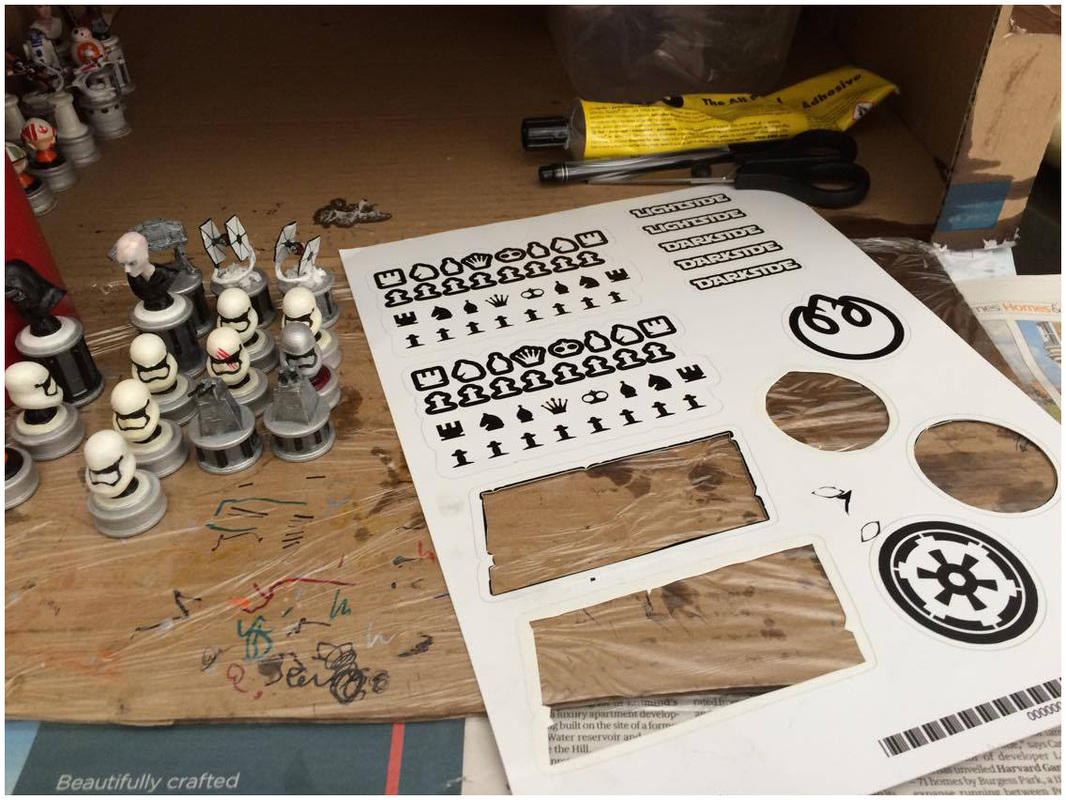
I put together some lightside and darkside text designs, along with chess piece symbols and a motif saying: ‘Lightside goes first, but The Empire Strikes Back’ for the sides of the box. (Hehehe). These were carefully measured and sent off to Sticker You, I got them back a month later - so luckily I did this early on.
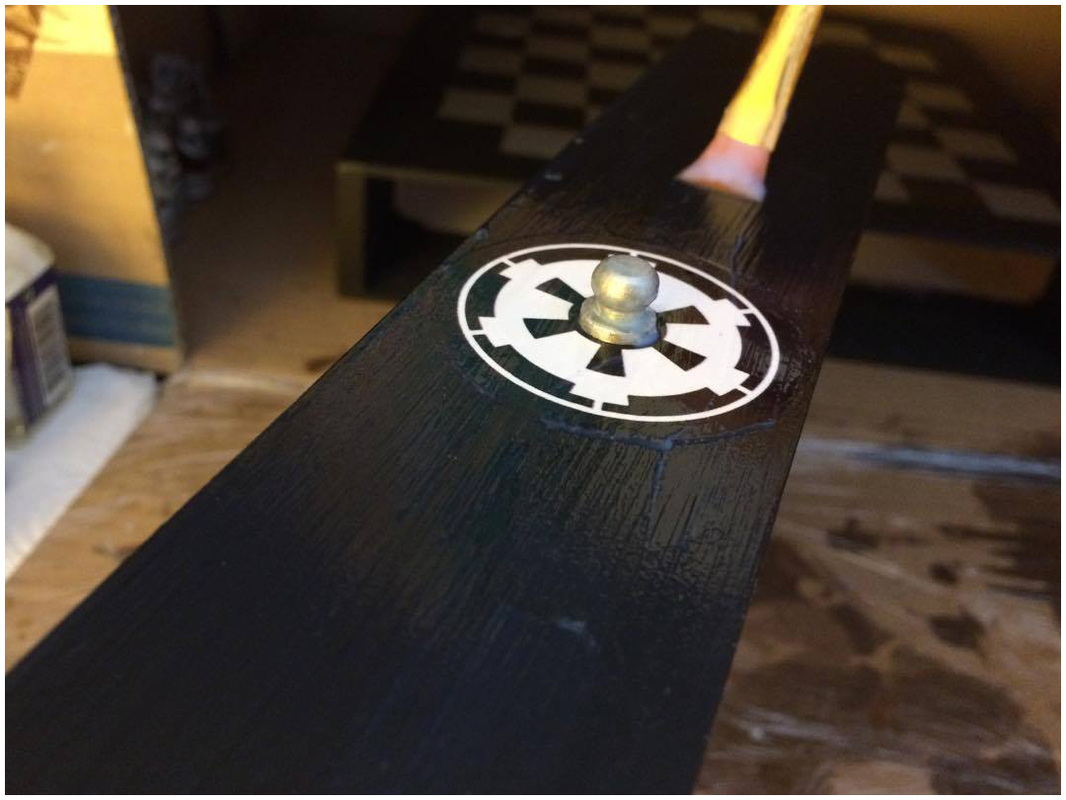
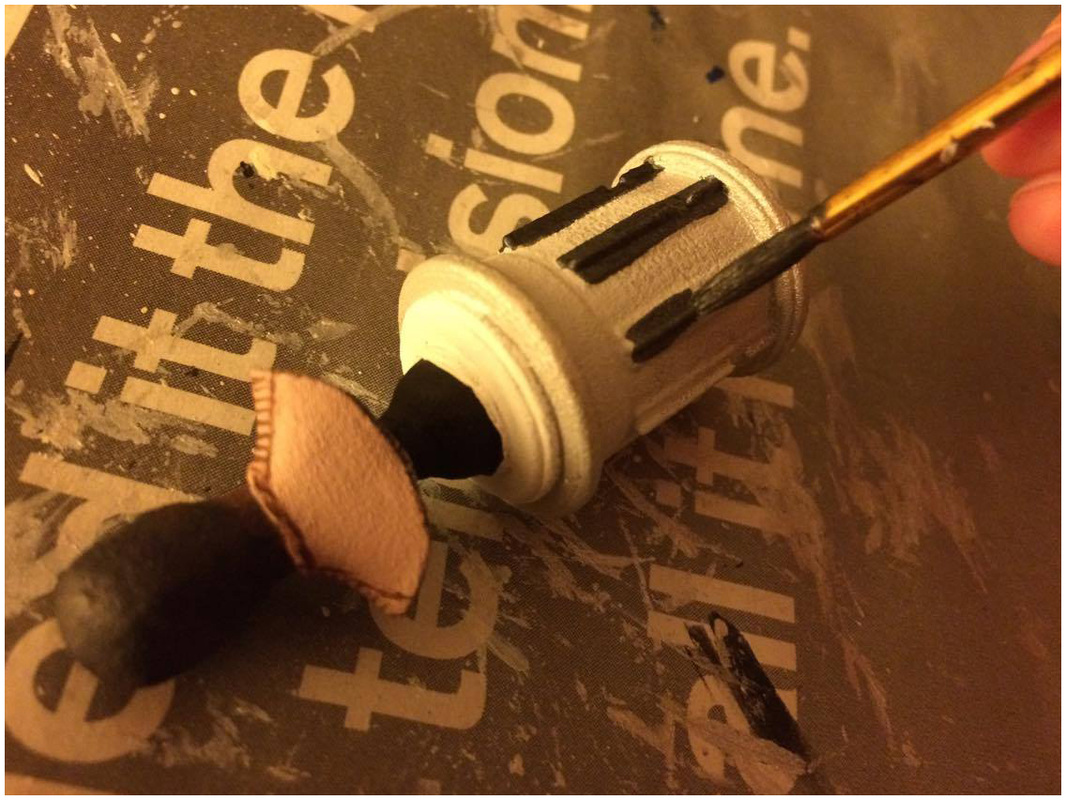
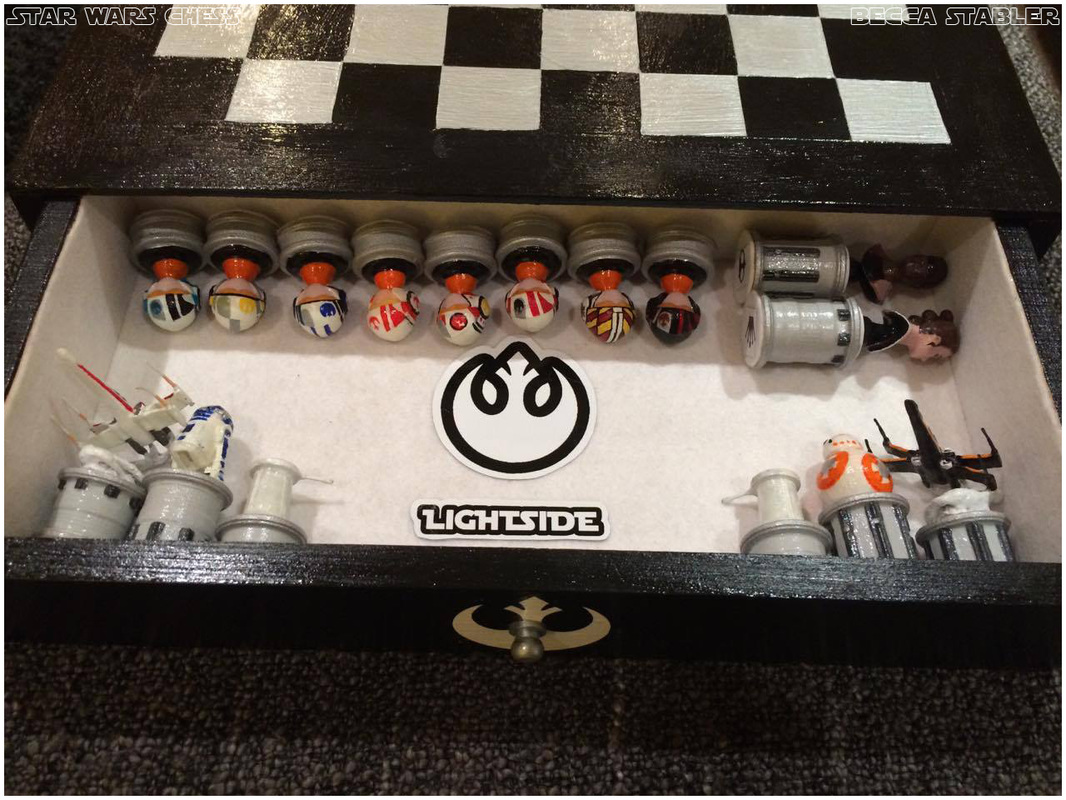
The drawers were lined with black felt for the darkside and white felt for the lightside. I also had stickers printed for the Resistance/Rebel Alliance and Imperial symbols to go inside and on the outside where the drawer knobs go. The drawer knobs, which were originally bronze coloured were painted silver and glossed before being screwed back on. Finally, the entire box and drawers were coated in gloss varnish to finish the look. Super pleased with the final result!
I put together some lightside and darkside text designs, along with chess piece symbols and a motif saying: ‘Lightside goes first, but The Empire Strikes Back’ for the sides of the box. (Hehehe). These were carefully measured and sent off to Sticker You, I got them back a month later - so luckily I did this early on.
The drawers were lined with black felt for the darkside and white felt for the lightside. I also had stickers printed for the Resistance/Rebel Alliance and Imperial symbols to go inside and on the outside where the drawer knobs go. The drawer knobs, which were originally bronze coloured were painted silver and glossed before being screwed back on. Finally, the entire box and drawers were coated in gloss varnish to finish the look. Super pleased with the final result!
The chess pieces
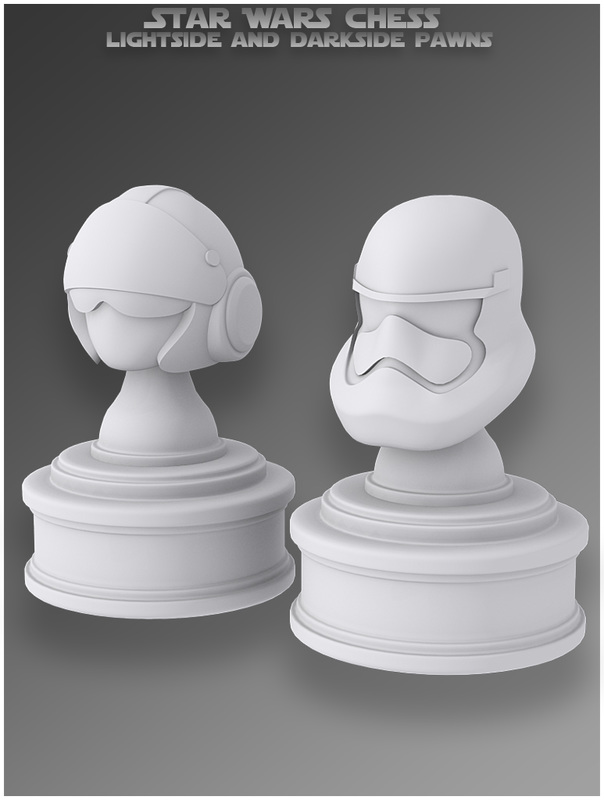
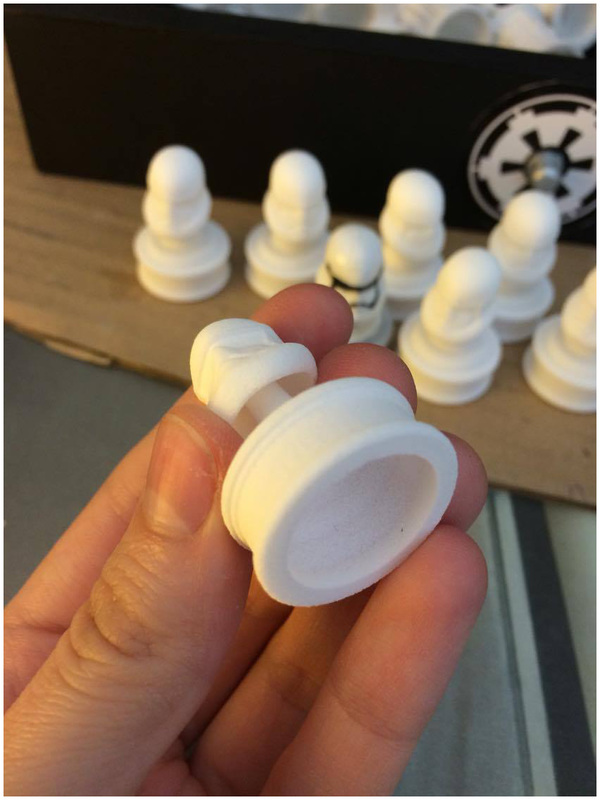
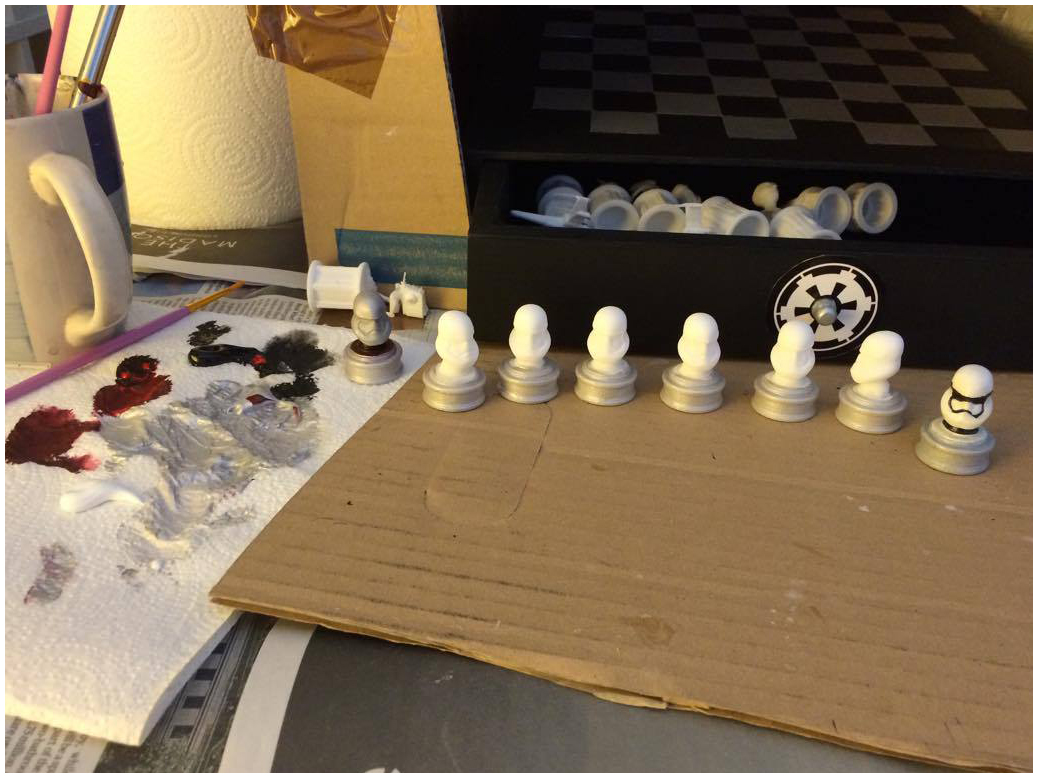
After getting a good idea in my head and a few very rough scribbles on paper, I began to build my 3D chess pieces in 3DsMax. At first I made the pawns, and went for storm trooper and rebel helmets. I hollowed them out so they would be as cheap as physically possible to produce, and they stood at 3cm tall being the shortest pieces on the board. These were sent off first to Shapeways so I could try out their size and weight, detail etc to gage what I could expect from my other designs. I chose to have them printed in their Strong and Flexible Plastic material as I thought it would have the best outcome detail-wise compared to price. I needed to bare in mind that I had 32 chess pieces to print, knowing the other pieces will be considerably bigger than the pawns and consequently more expensive.
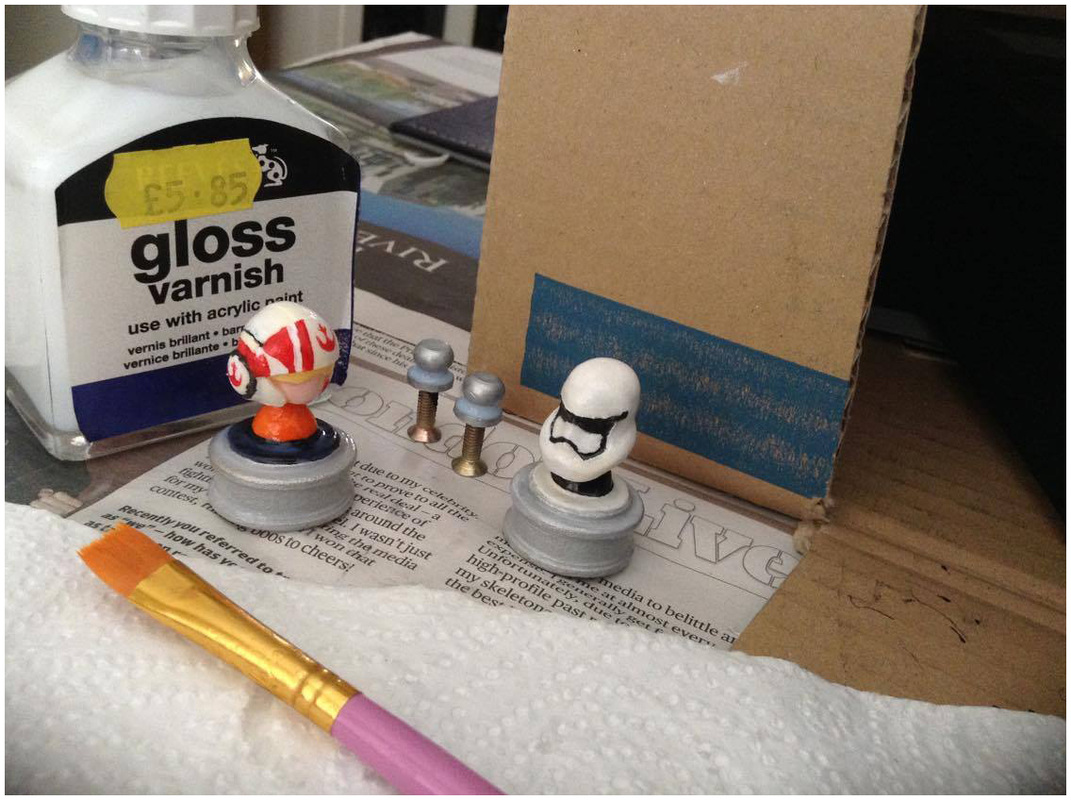
The tester pawns drying out with the drawer knobs after being glossed.
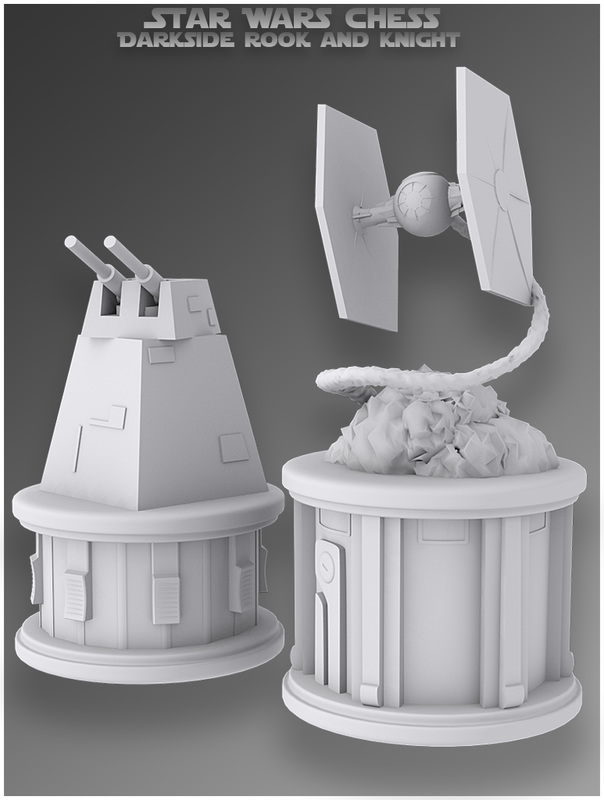
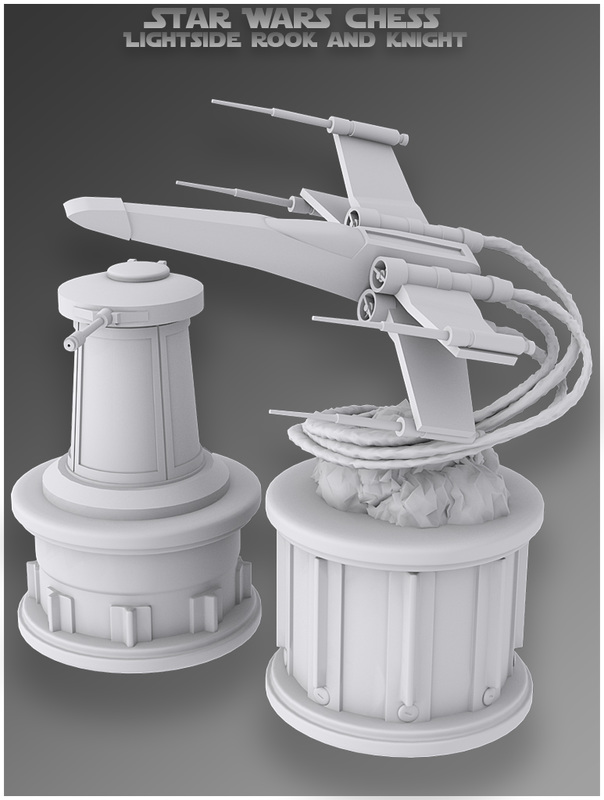
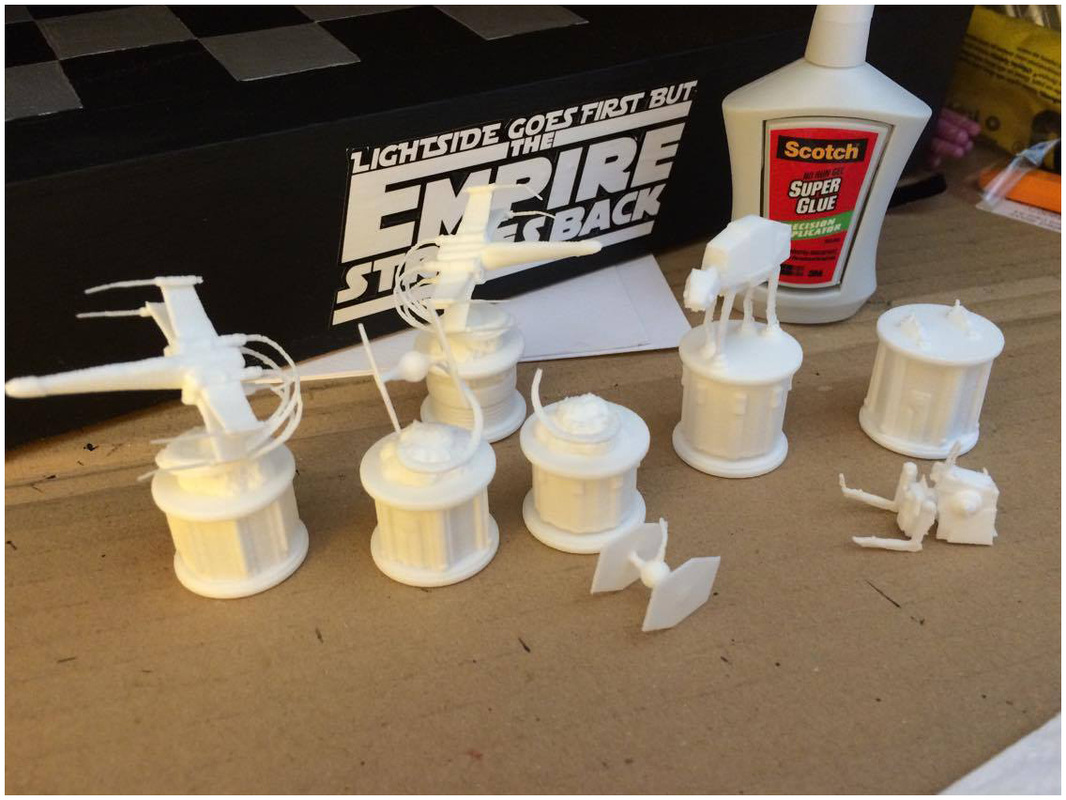
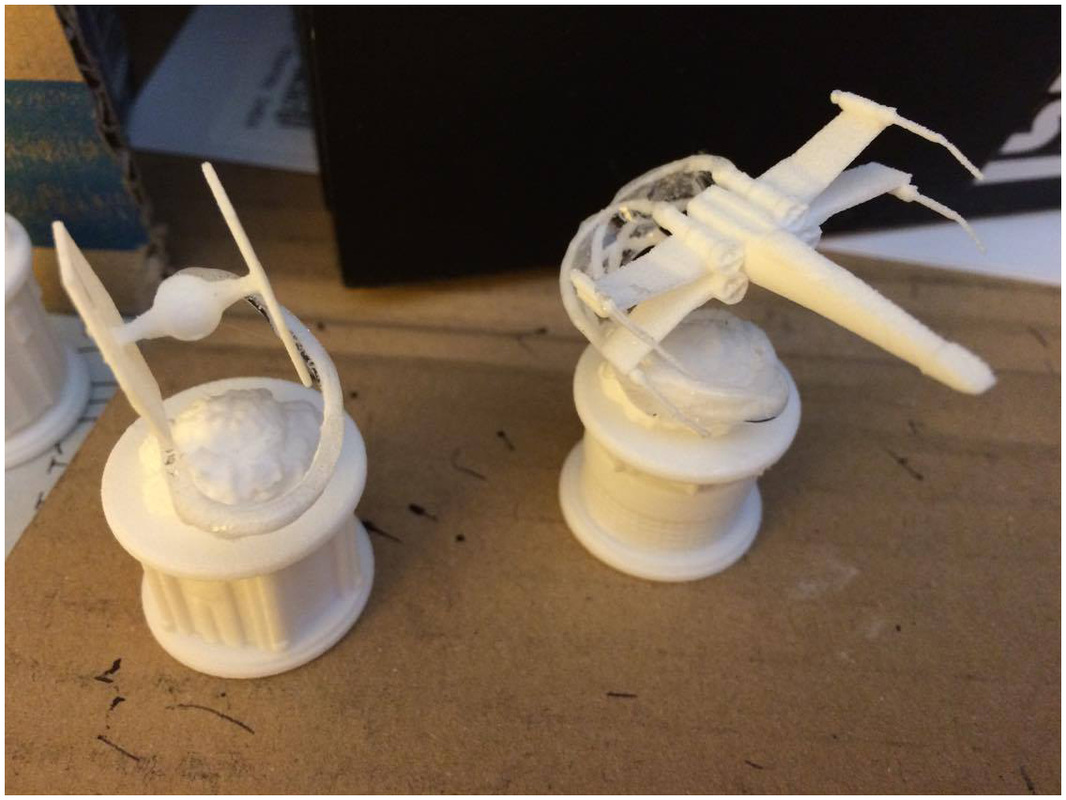
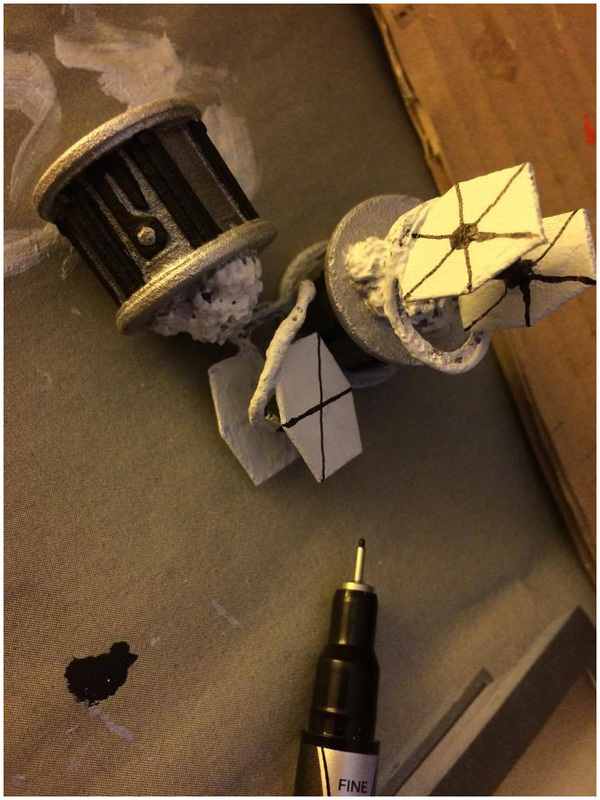
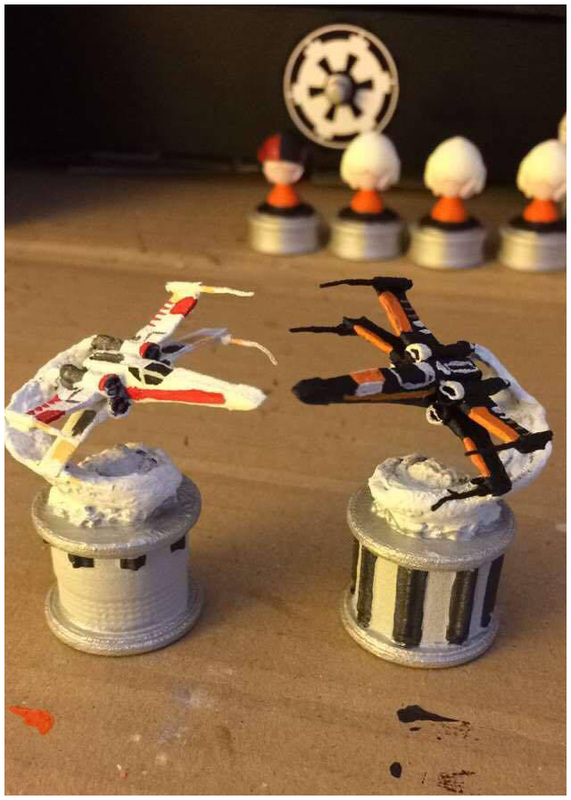
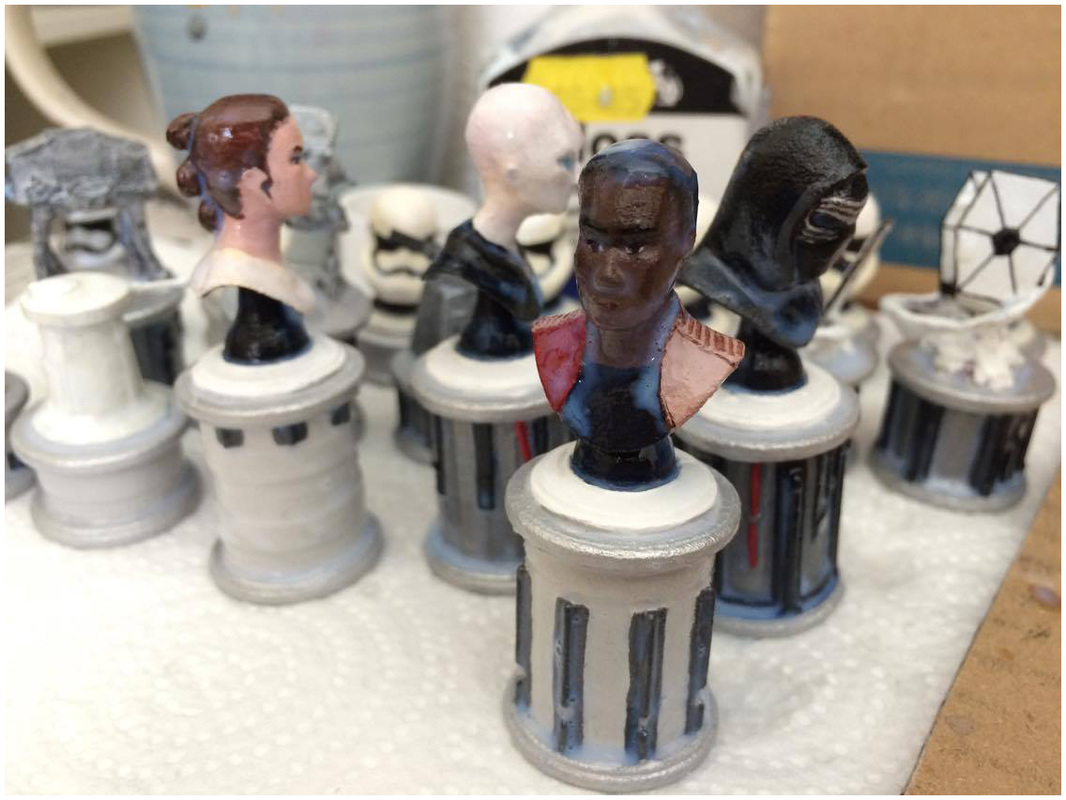
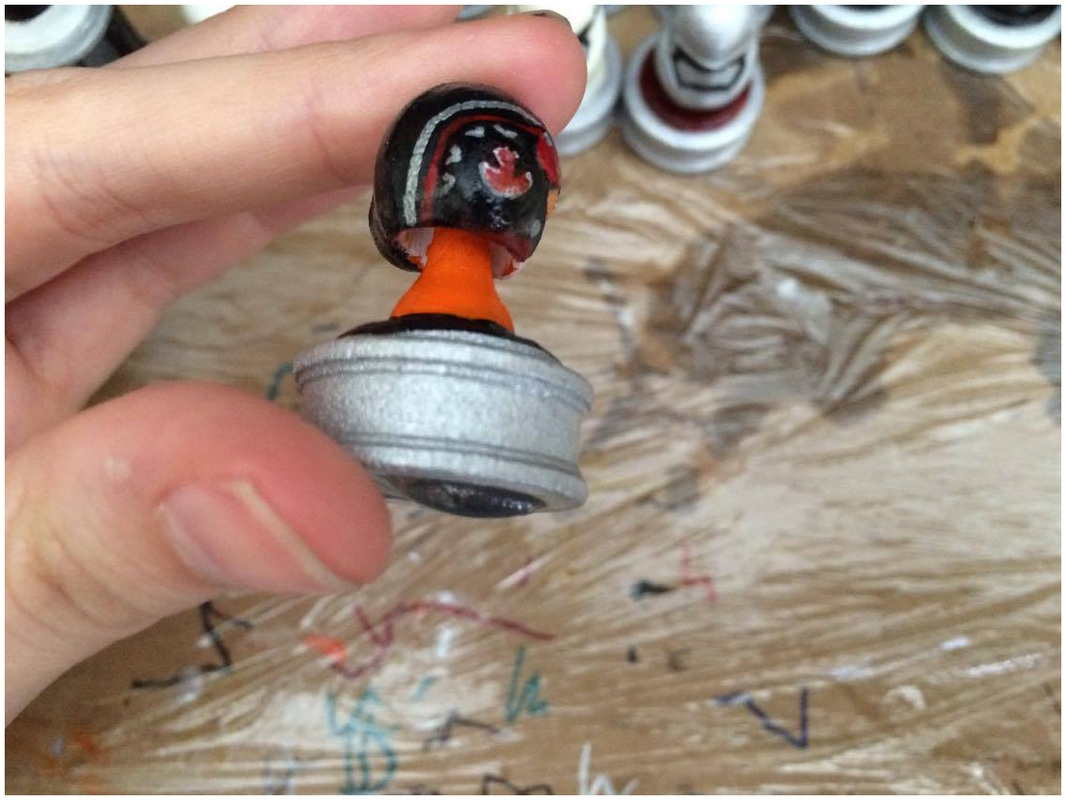
When the first attempt came back successful, I moved on to create the other pieces - this took the most time, there was a lot of problem solving. The kings and queens ended up being the tallest at about 7cm. The rooks, knights and bishops were between these heights, the rooks being shorter to the edge of the board and sitting just above the pawns, and the bishops being taller as they sit near the middle of the board. Because I made all the pieces hollow so the 3d printing price would be lower, it meant I had to be careful about the thickness of my model walls so they would be able to survive printing, packing and shipping successfully. I made lightsabre hilts from Kylo Ren’s and Luke’s first lightsabre before he loses his hand. Sections of these were used for the pillars in the main chess pieces, I flipped them and made the section used as random as possible so each piece was unique. Skinny parts had to be thickened in 3DsMax when it came to uploading to the Shapeways site for printing. They’ve got super useful tools that tell you what parts of your model are suspiciously thin (per material too) and warn you about problem areas. On the AT-AT, AT-ST, X Wings and Tie Fighters I had some amber warnings about thickness in areas; I thickened these a little bit and hoped I could get away with it.
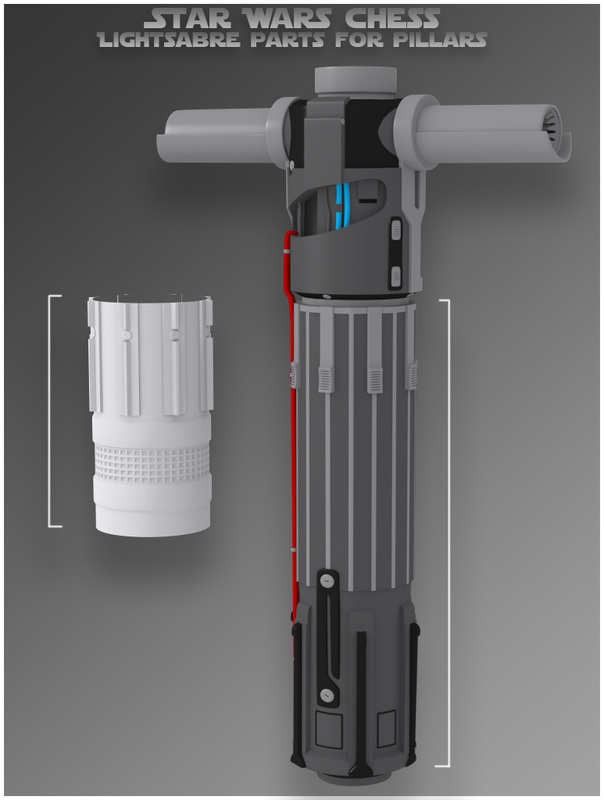
Luke's and Kylo's sabre hilt details were used for the chess piece pillars.
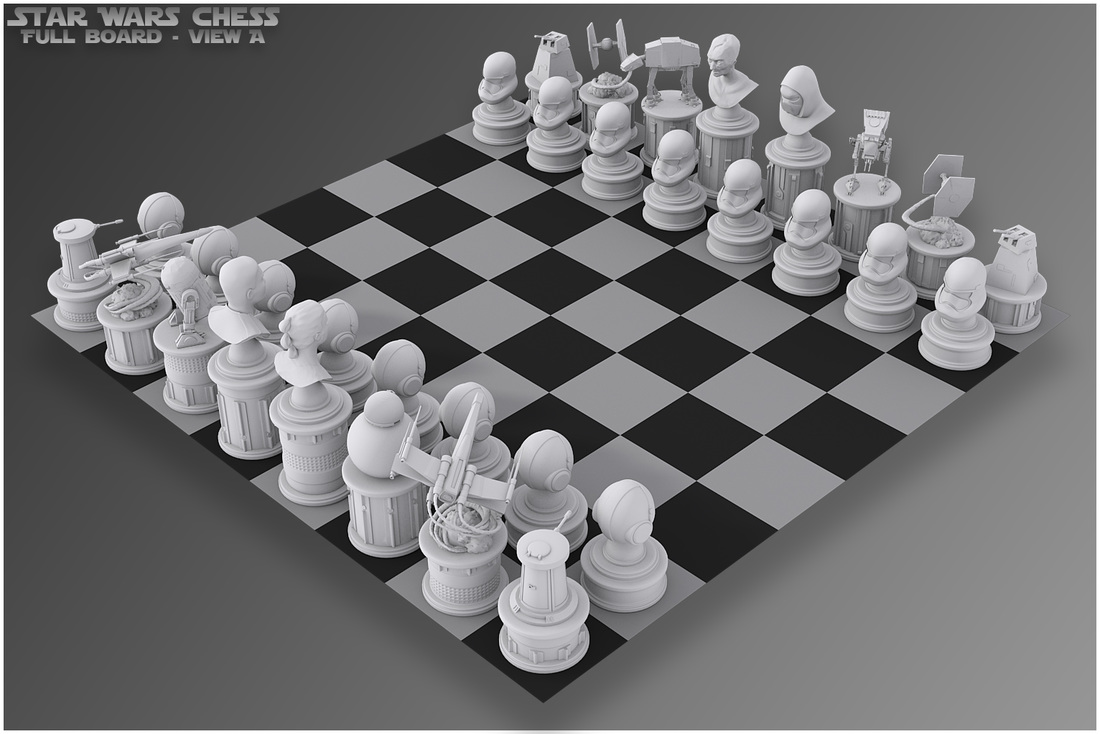
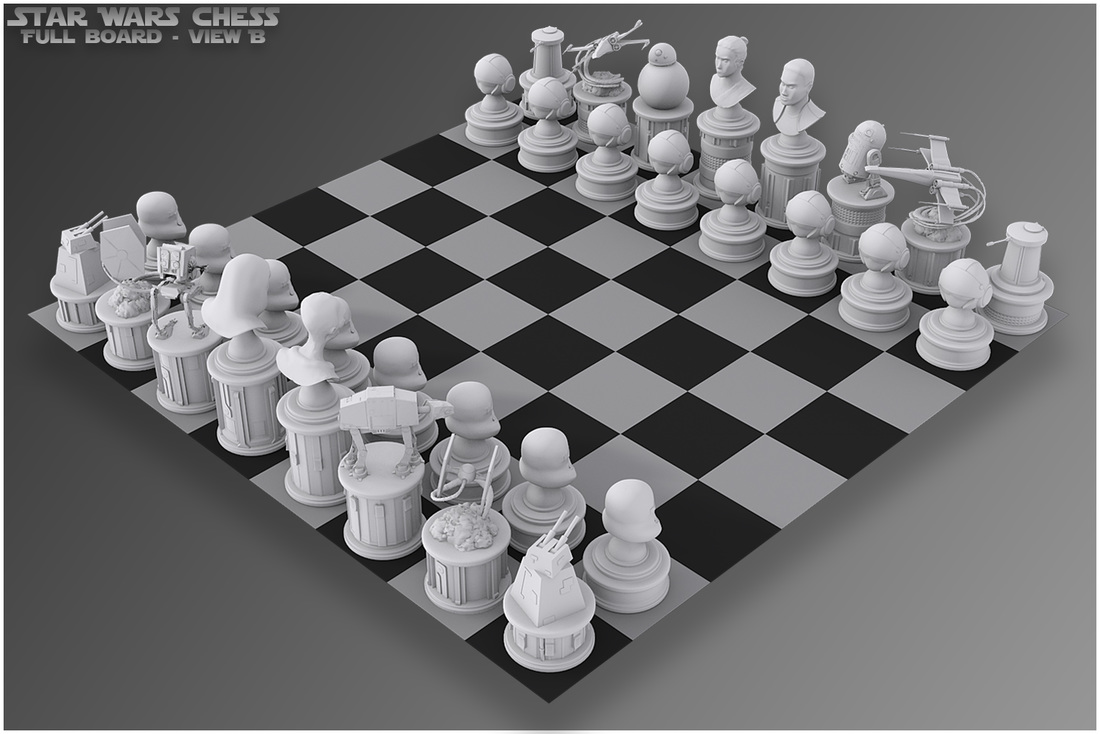
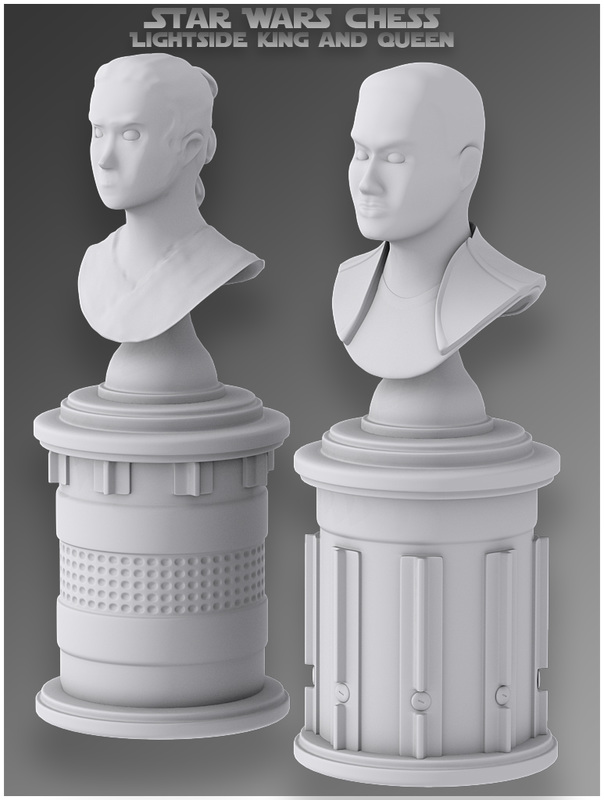
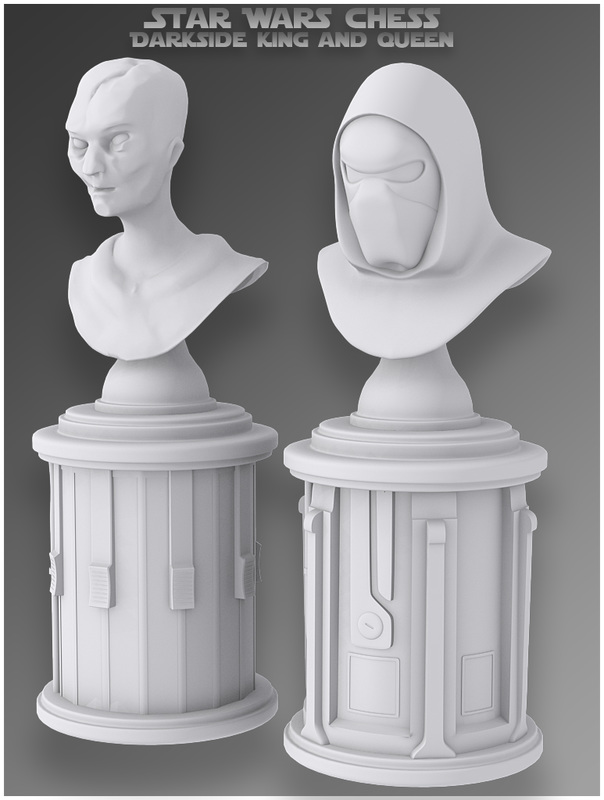
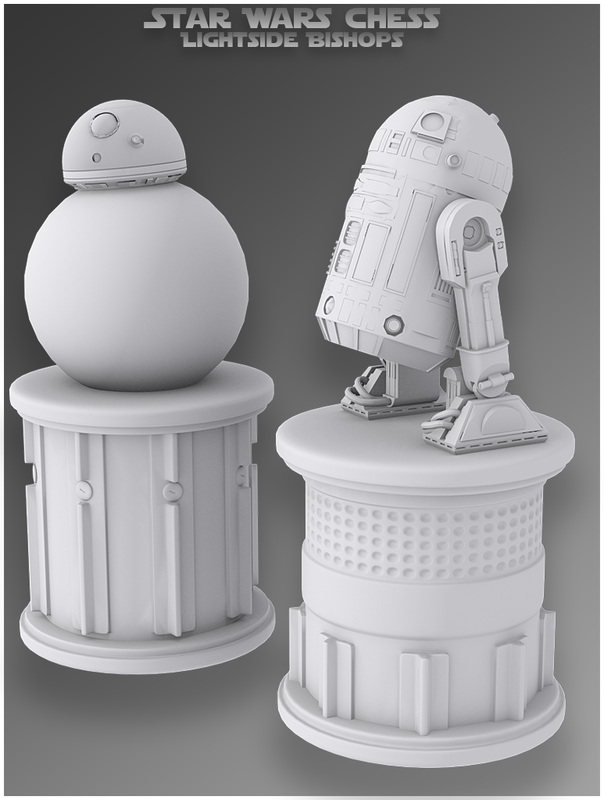
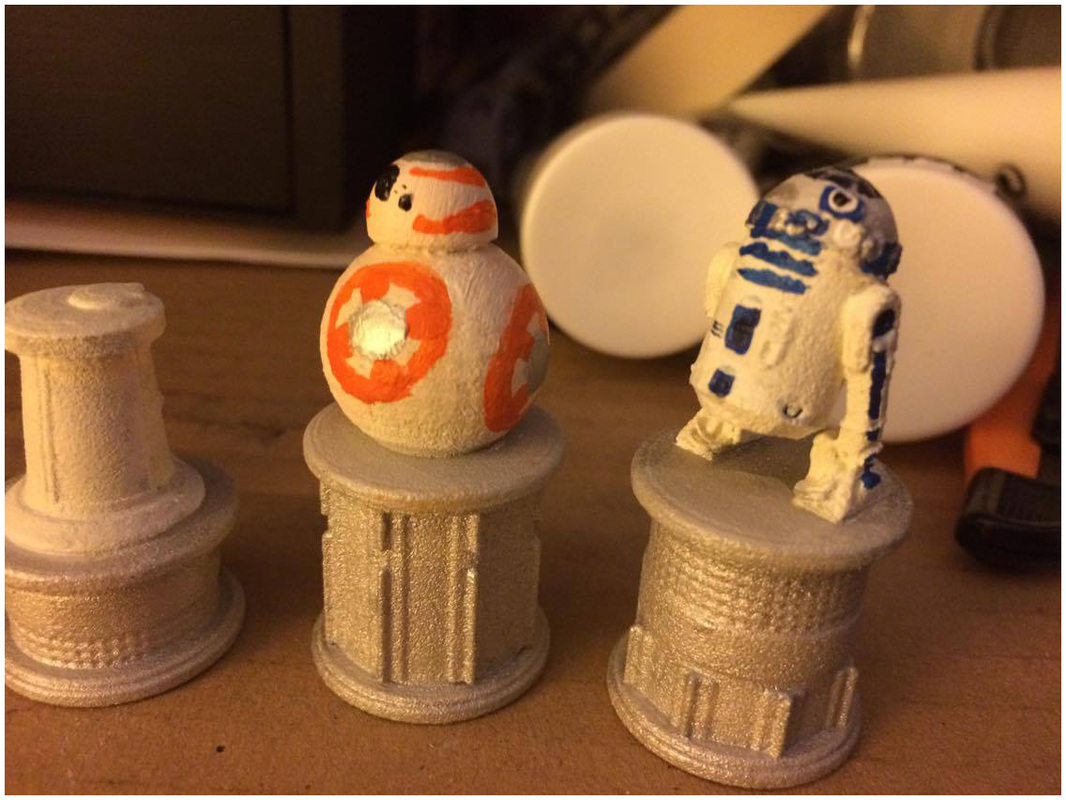
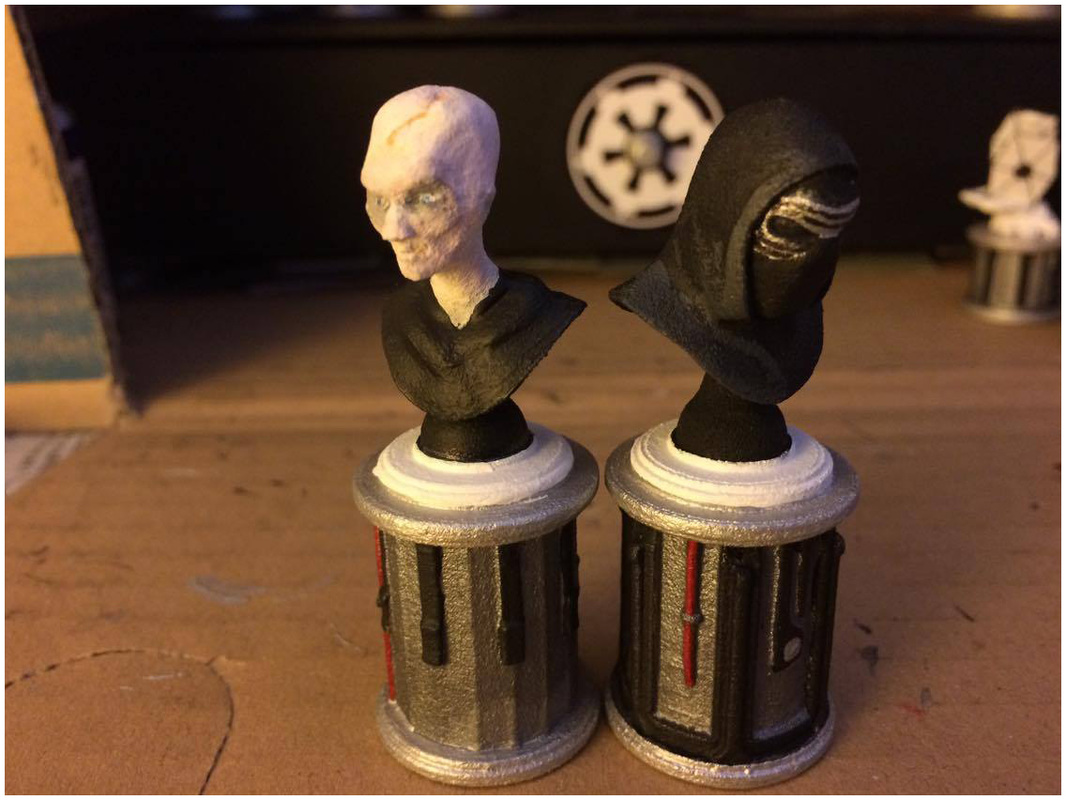
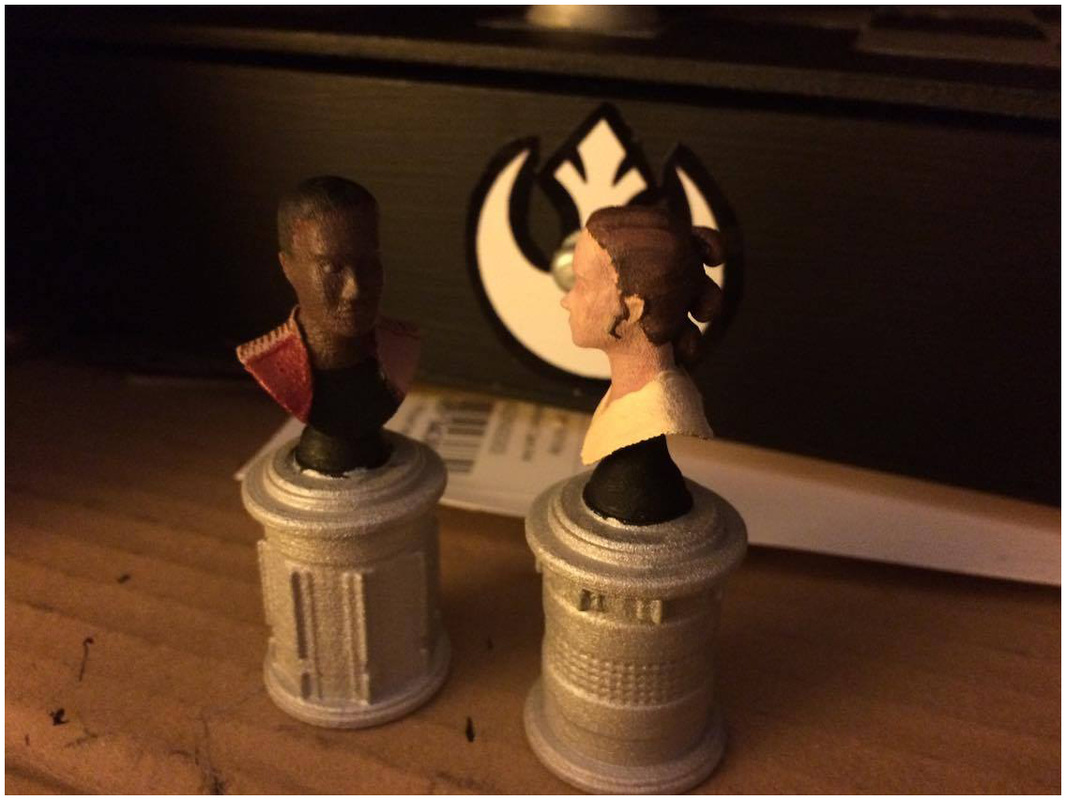
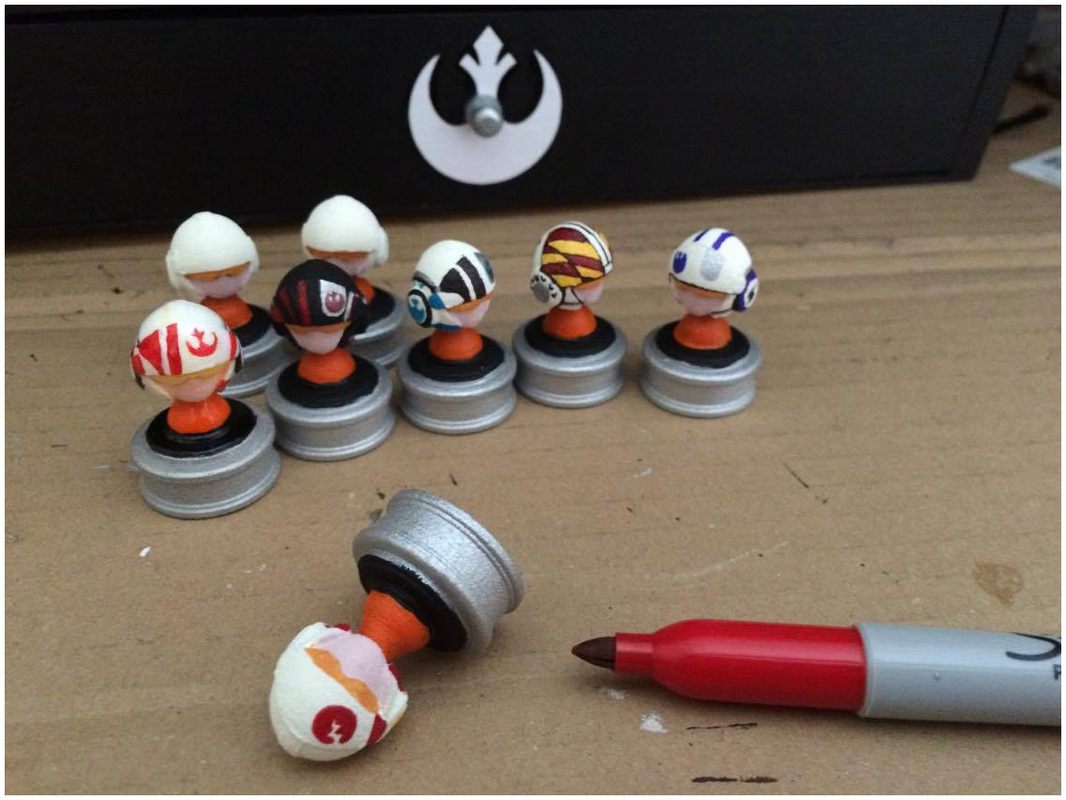
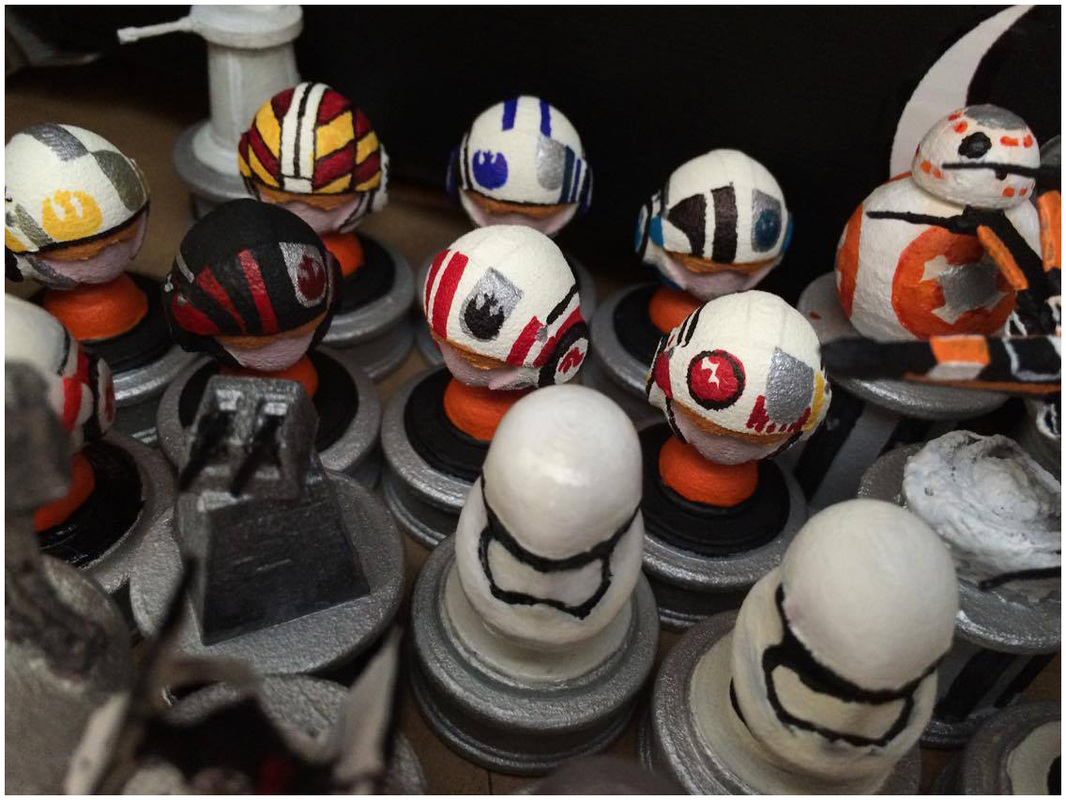
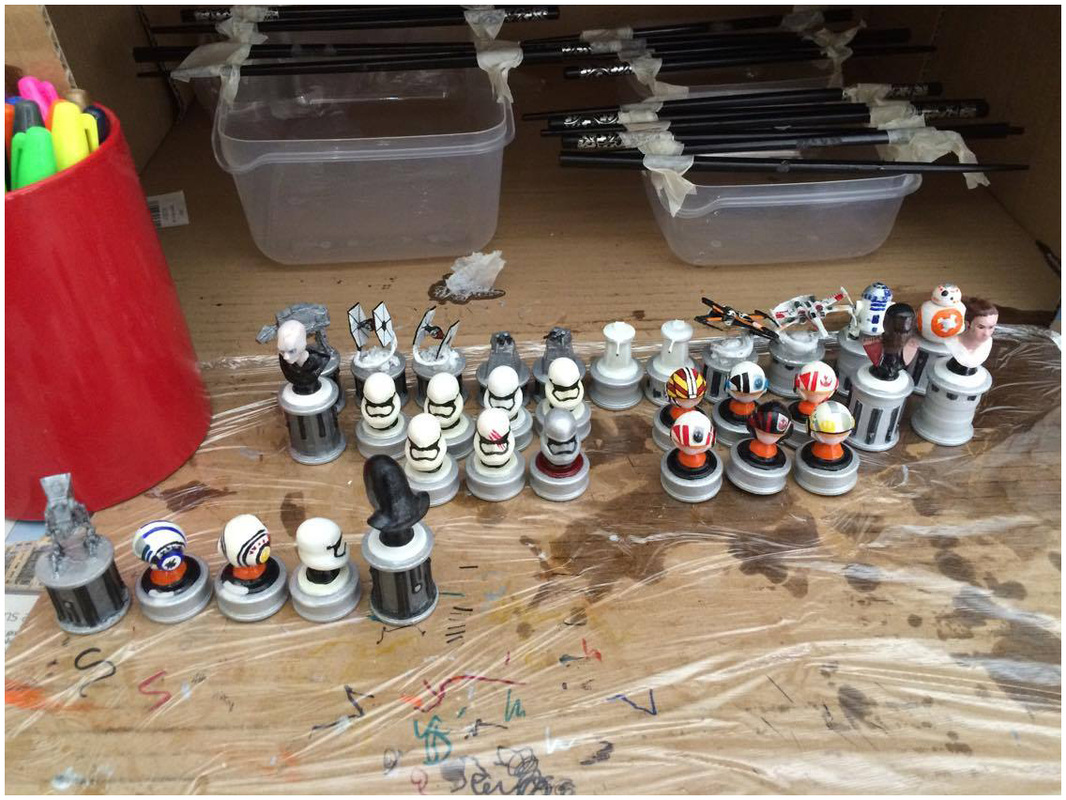
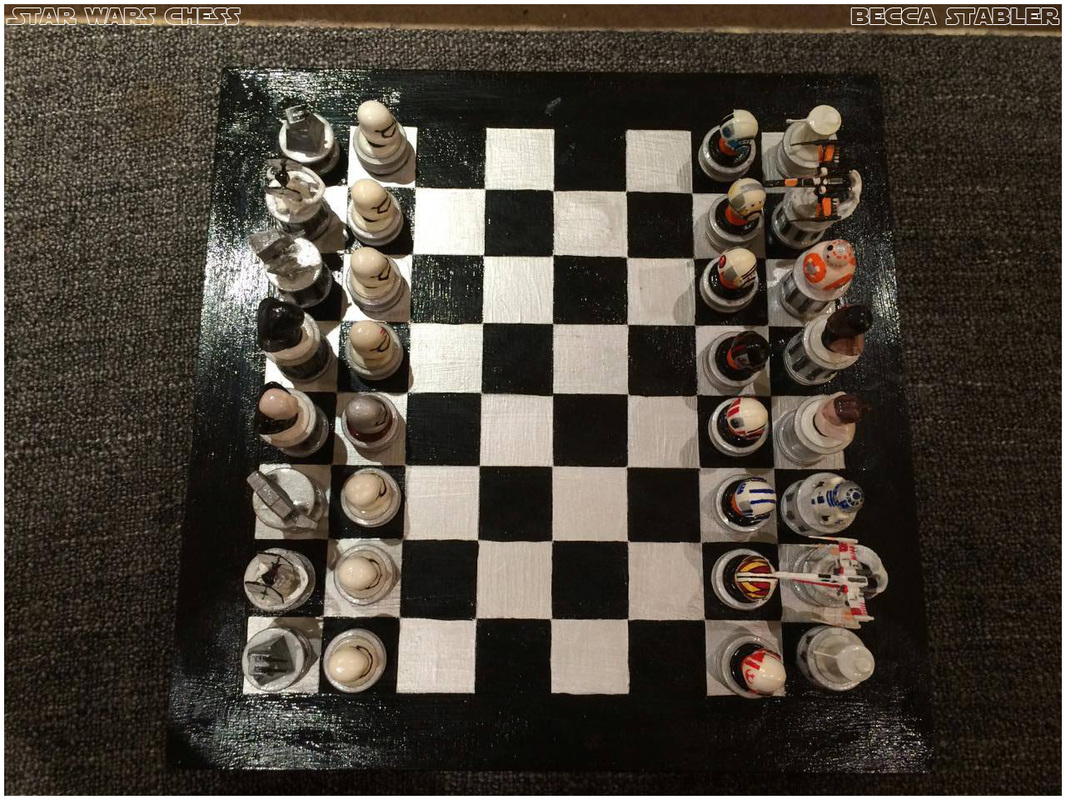
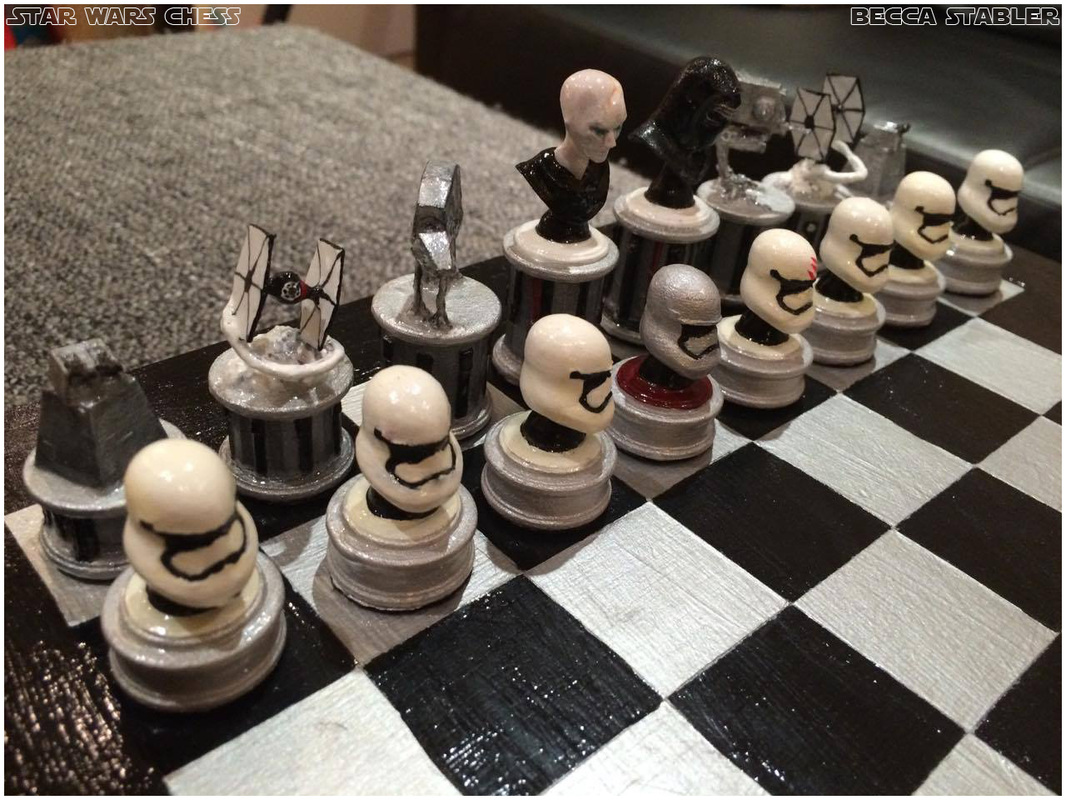
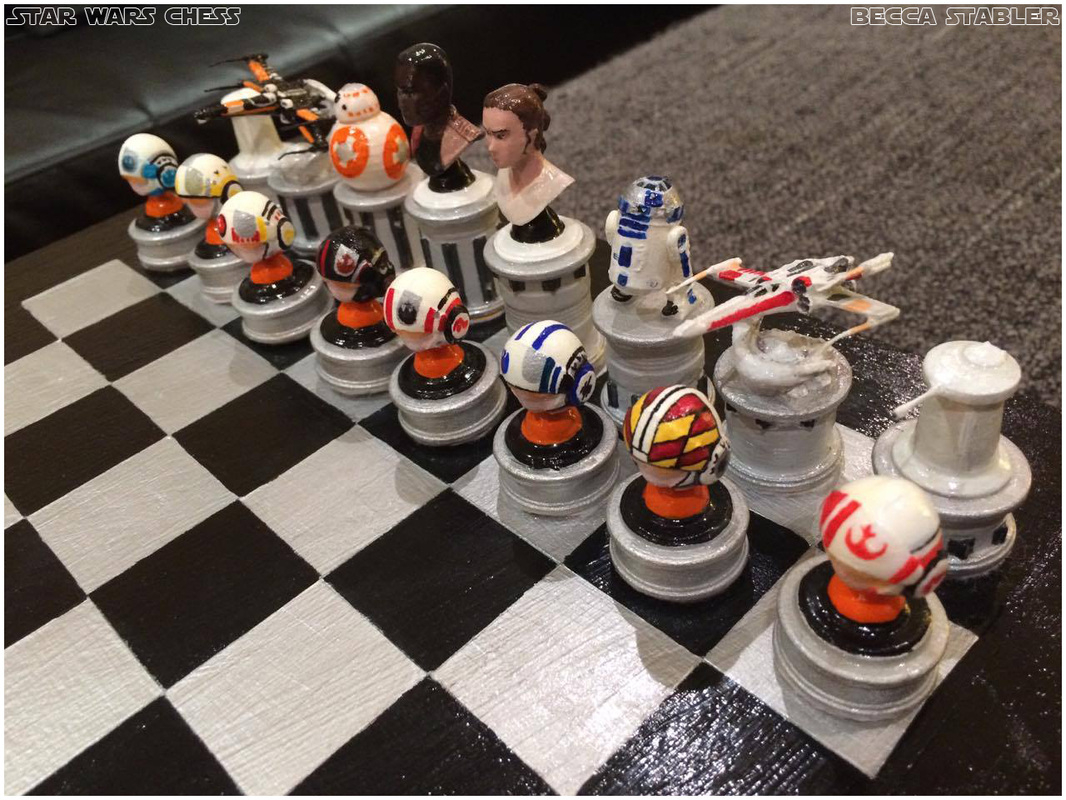
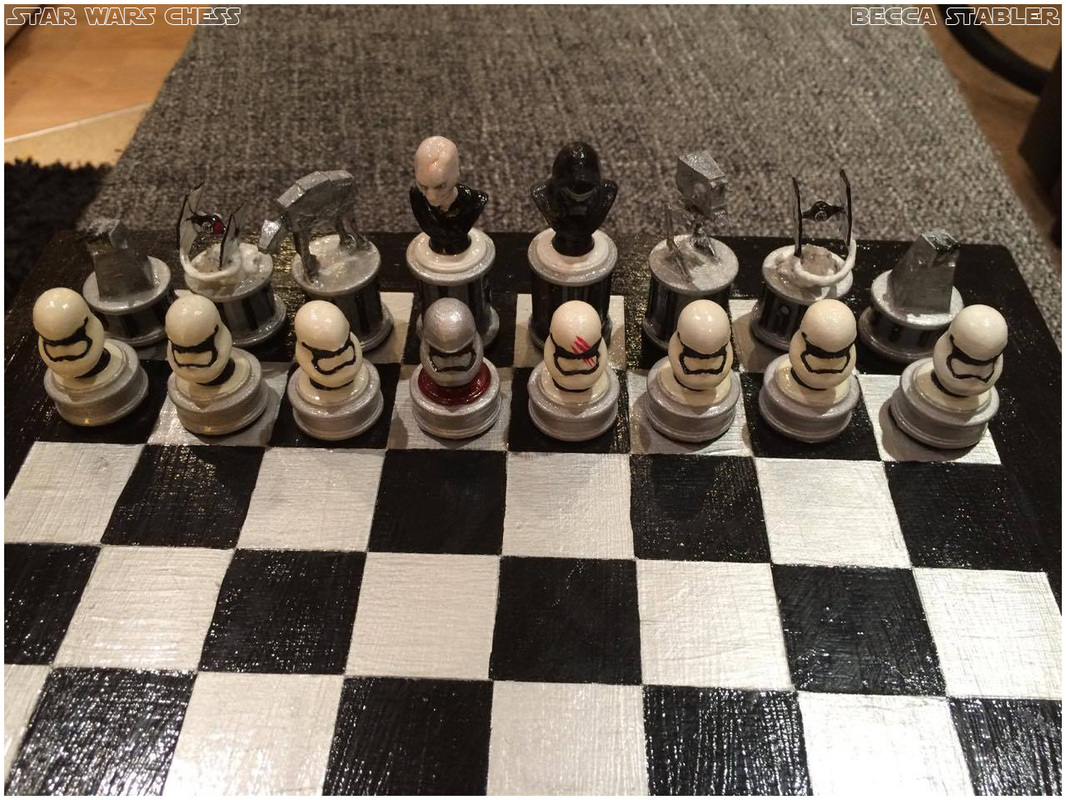
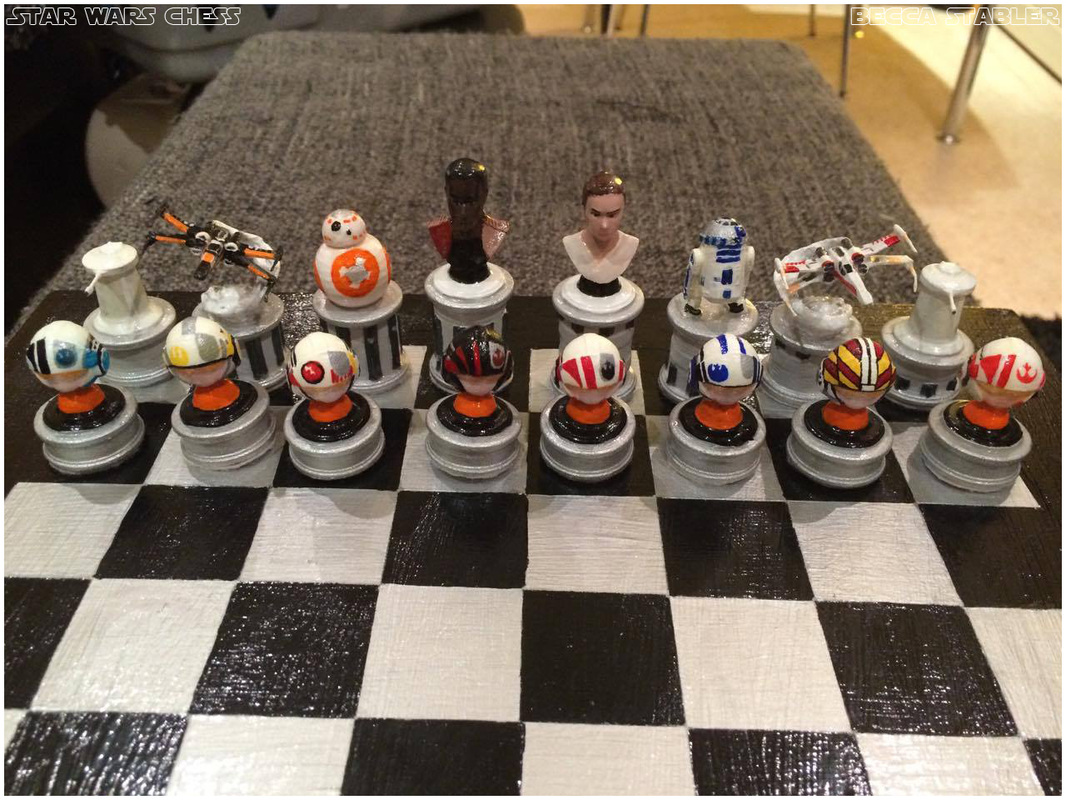
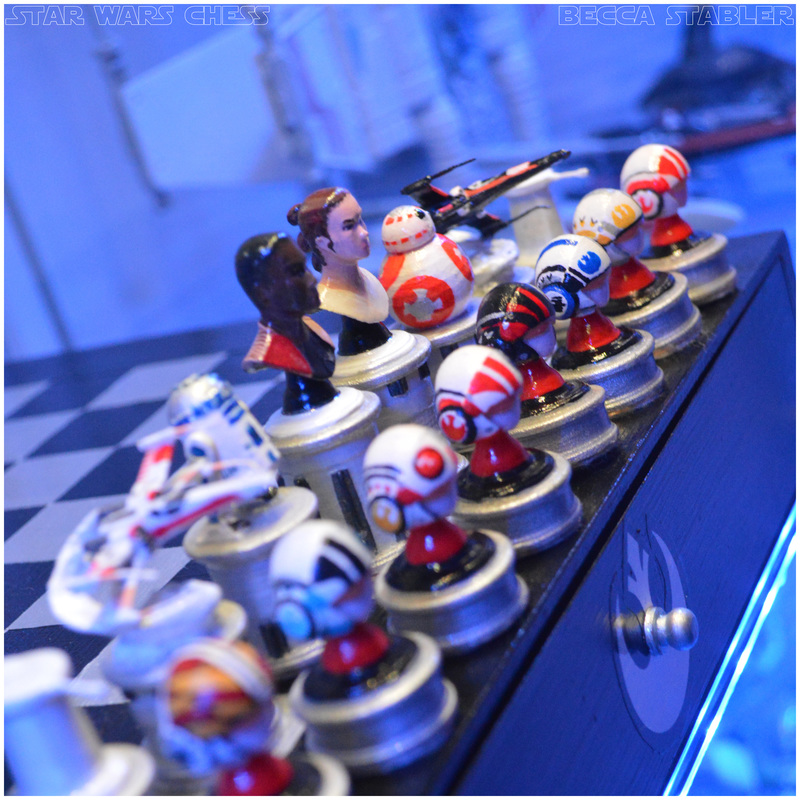
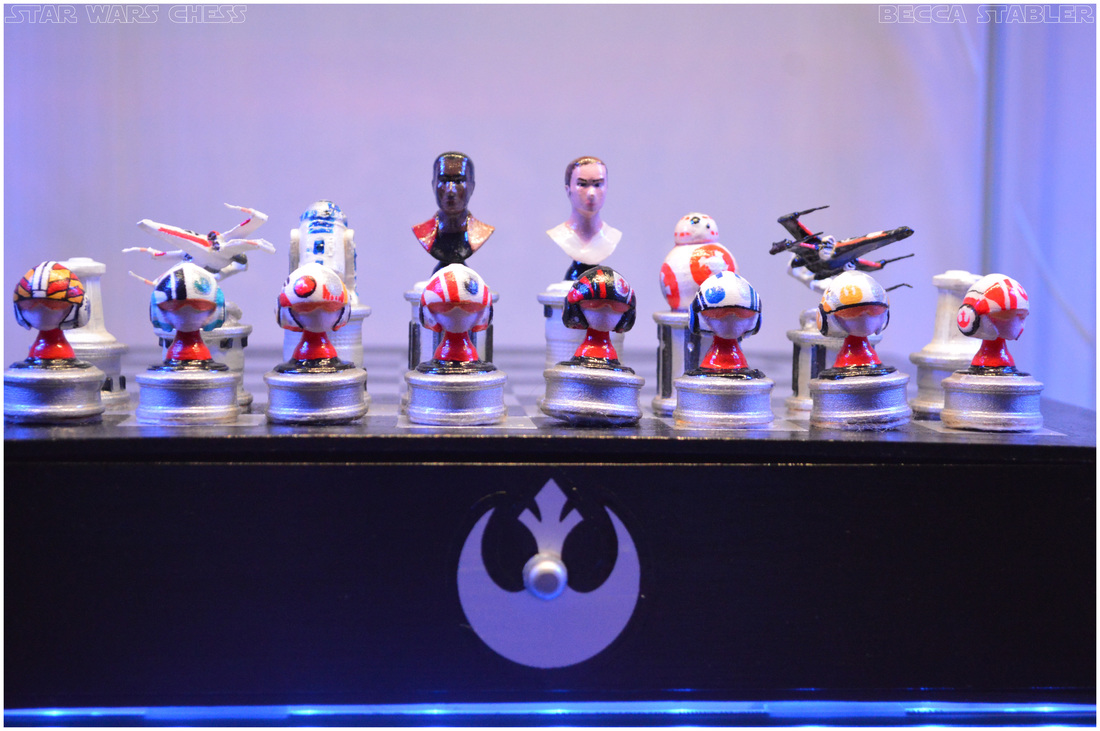
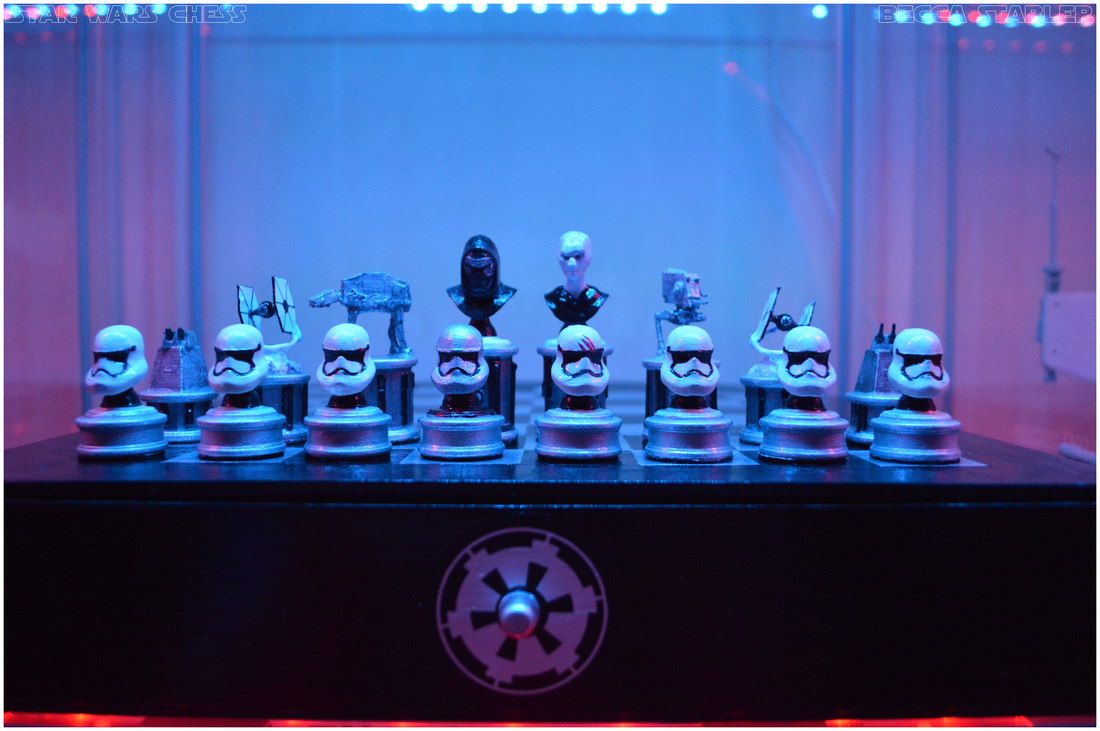
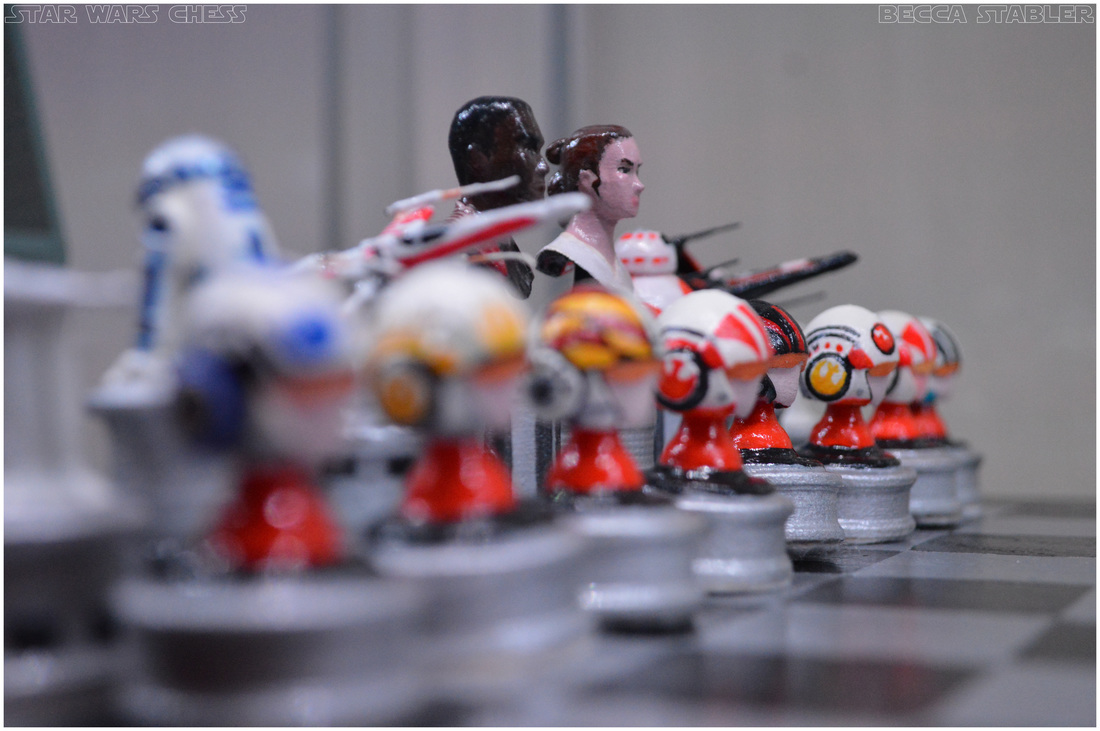
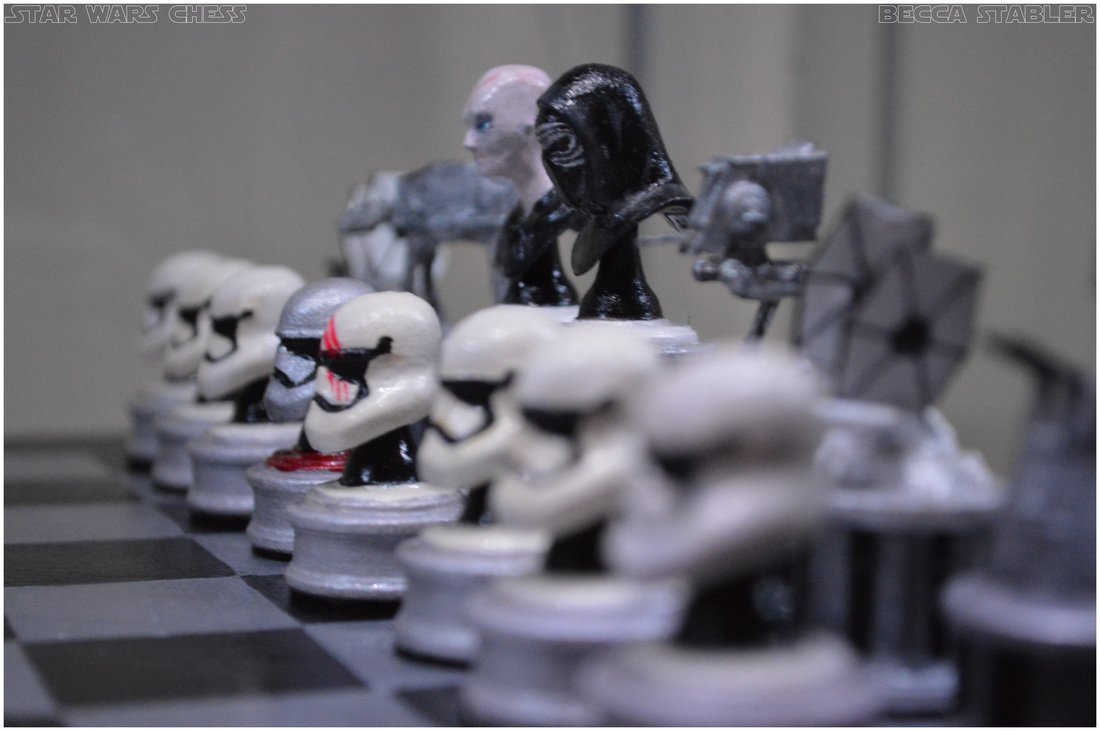
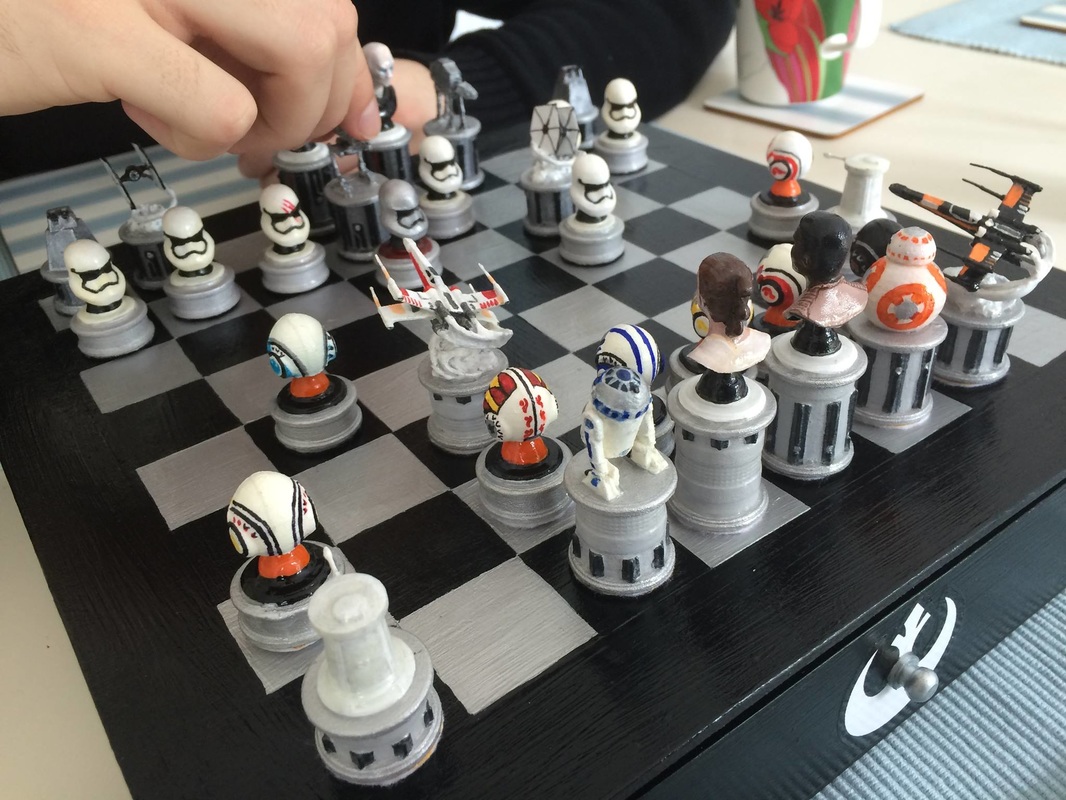
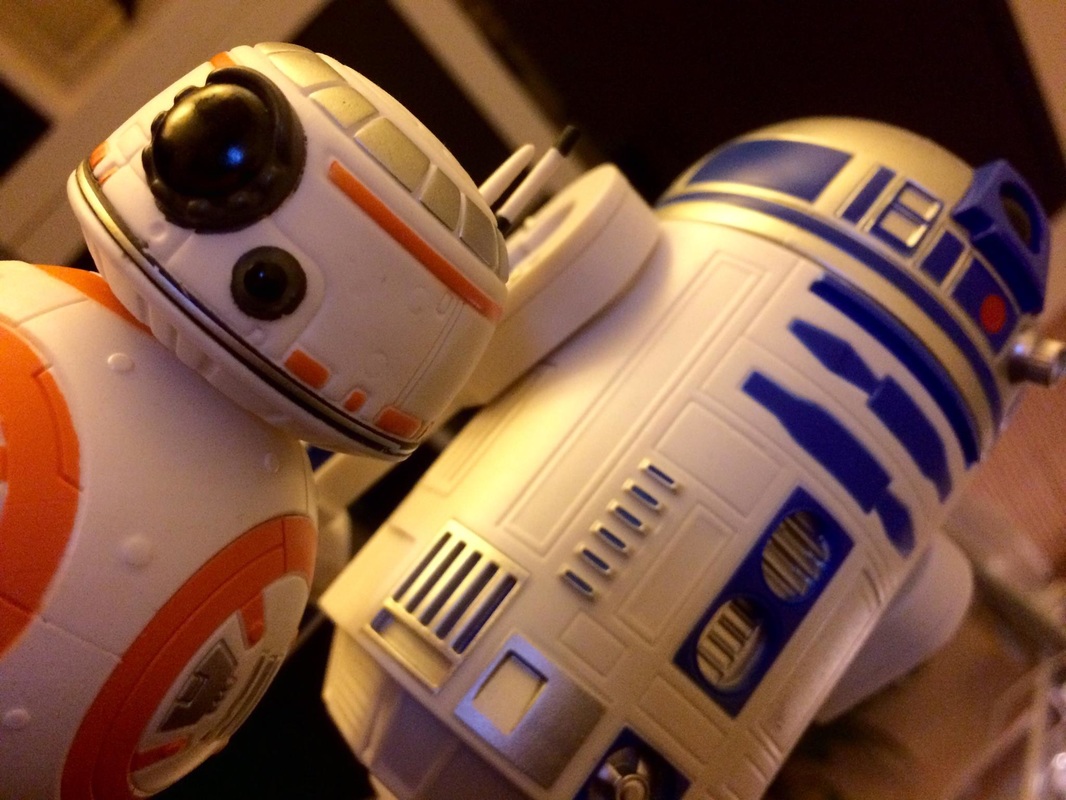
| Darkside King: Supreme Leader Snoke Queen: Kylo Ren Bishops: AT-AT & AT-ST Knights: Tie fighters Rooks: Imperial Turbo-laser turret Pawns: Storm Troopers (with Captain Phasma) | Lightside King: Finn Queen: Rey Bishops: BB8 & R2D2 Knights: X-Wings Rooks: Rebel Turret Pawns: Rebel fighters (with Poe) |
The models were all created by myself in 3DsMax, but to save on time I downloaded a couple of existing models from websites like Thingiverse. I was able to simplify the mesh and make it slightly chunkier for printing where needed. In some areas I needed to fill in spaces with boxes and cylinders. When it came to the tie-fighters and x-wings, I wanted to find a way to suspend the aircraft above it's plinth. In the end I settled for a smoke slipstream trailing behind it, swirling around down to the surface beneath, finished off with billows of smoke as if just taken off. I used the noise modifier in 3DsMax to give the impression of little plumes in the smoke. Also with these models, I flipped the meshes for the sister piece and gave them different pillar sections for variety -same for the rooks. For the characters I decided to stick to a bust design to save things from getting realllyyyyy fiddly, also it was less work that way and I was starting to run out of time. Uploading to Shapeways took several evenings, simply because if there was something wrong with the mesh (i.e- x forms needing to be reset, stray verts, holes) it would sit on the uploading icon for an age before refreshing the page if it didn't like it.
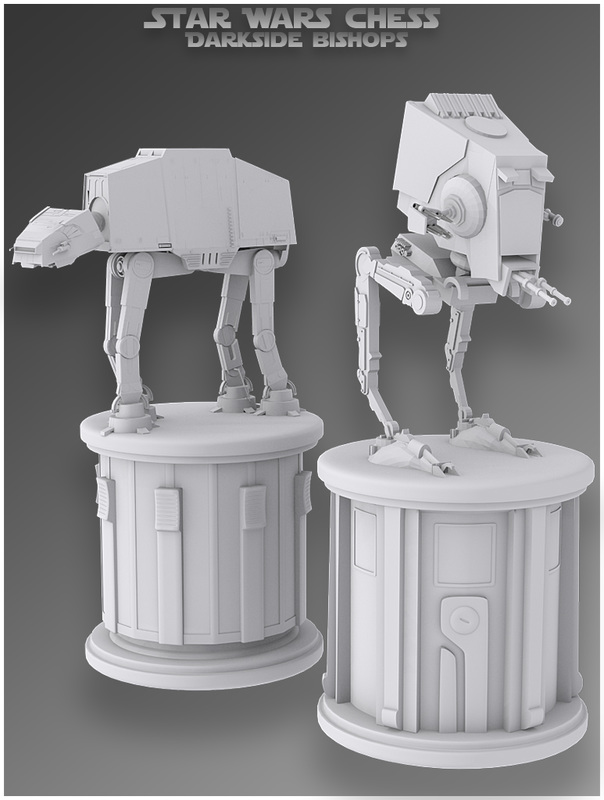
I sent them off to Shapeways and they arrived a couple of weeks later. Turns out I had pushed my luck a little bit with a few of the pieces… they had a few spindly parts which I did thicken, but it wasn't enough in some areas and they arrived snapped from the rest of the model. I wasn't too concerned about this, when I got them home I used a super glue gel to bond the broken parts together. Once this had dried I was able to use UHU glue (very thick, smelly and gloopy, and not very neat) to thicken the spindly parts that had snapped in production. When this was dry these areas were pretty strong, I was able to apply a little pressure and the part would be quite springy, bouncing back to the original shape. When I was happy with this I began painting acrylic straight on. I had the models printed out in Shapeways’ Strong and Flexible Plastic - a cheap and waterproof material, a little grainy to the touch and very light. I would have really loved to print them out in metals, but the price would have been extortionate. The 3d printed chess pieces alone cost me around £170 including handling VAT and shipping.
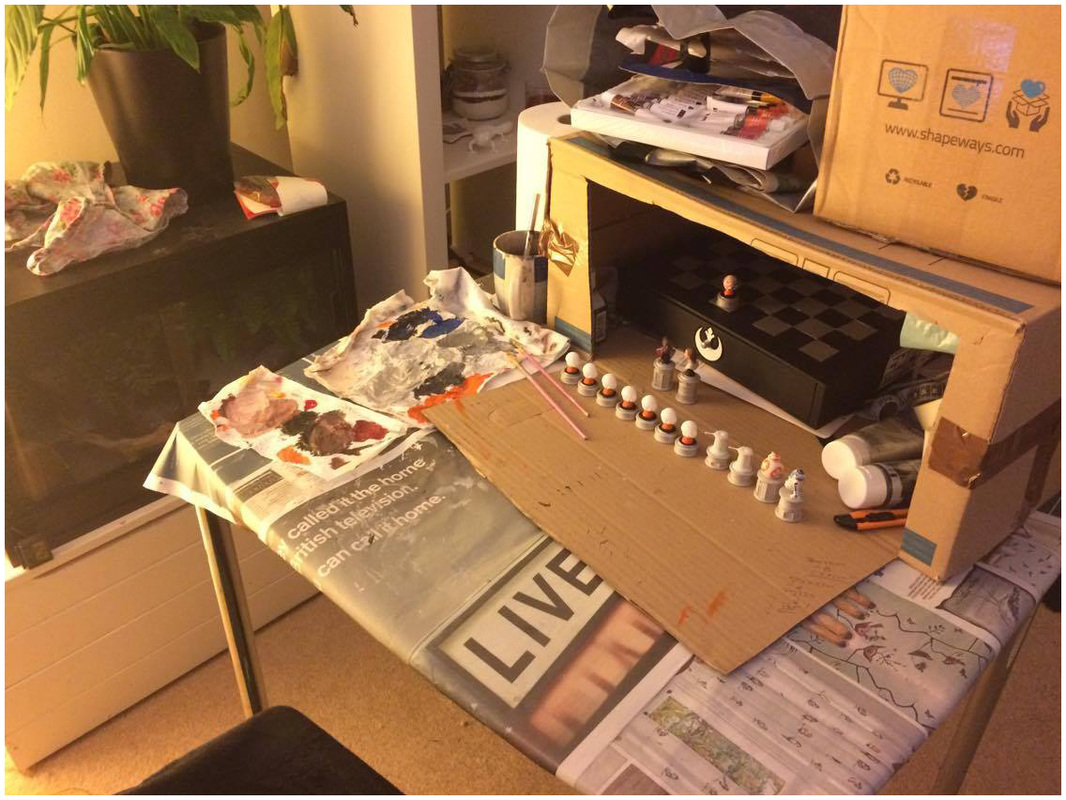
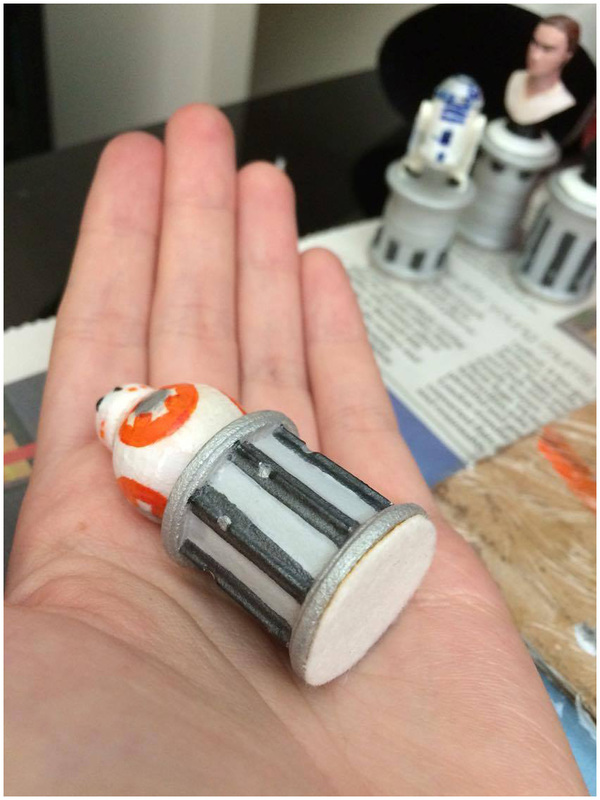
I learned a lot from this project, but if I had to come away knowing one thing, it’s that I definitely do not have a steady hand. The amount of times I had to repaint bits where I was shaky or applied paint to thickly was ridiculous. The tie fighters must've been redone about 6 times before I finally settled for using a fine line pen for the structure detail, I just couldn't get it right with the paint, even with my teeniest brush. BB8 and R2D2 were also equally frustrating to paint, and felt I didn't get much detail on them as they were so small to paint on. When I had done two of the rebel helmets using acrylic paint I decided to use a different method (mainly because they took so long being so fiddly and I was running out of time a little). I went out and got myself a big pack of Sharpies, and used these for the rest of the helmet designs. It was so much faster and I think I'm pretty happy with the outcome. Luckily they didn't conflict with the overall look and feel to the rest of the pieces. Once I was satisfied that all the models were painted to a finish I was happy enough with, I glossed them all twice. I was surprised at how much this ‘finished’ the look of the pieces and was really happy with the result. The only annoying thing I had to deal with was that when the light blue and orange Sharpies were glossed over, the ink ran! BB8 and one of the rebel helmets needed a little more care after that by having thinner coats of gloss; I think BB8 got away with it but the light blue on one of the rebel helmets still looks smudgy.

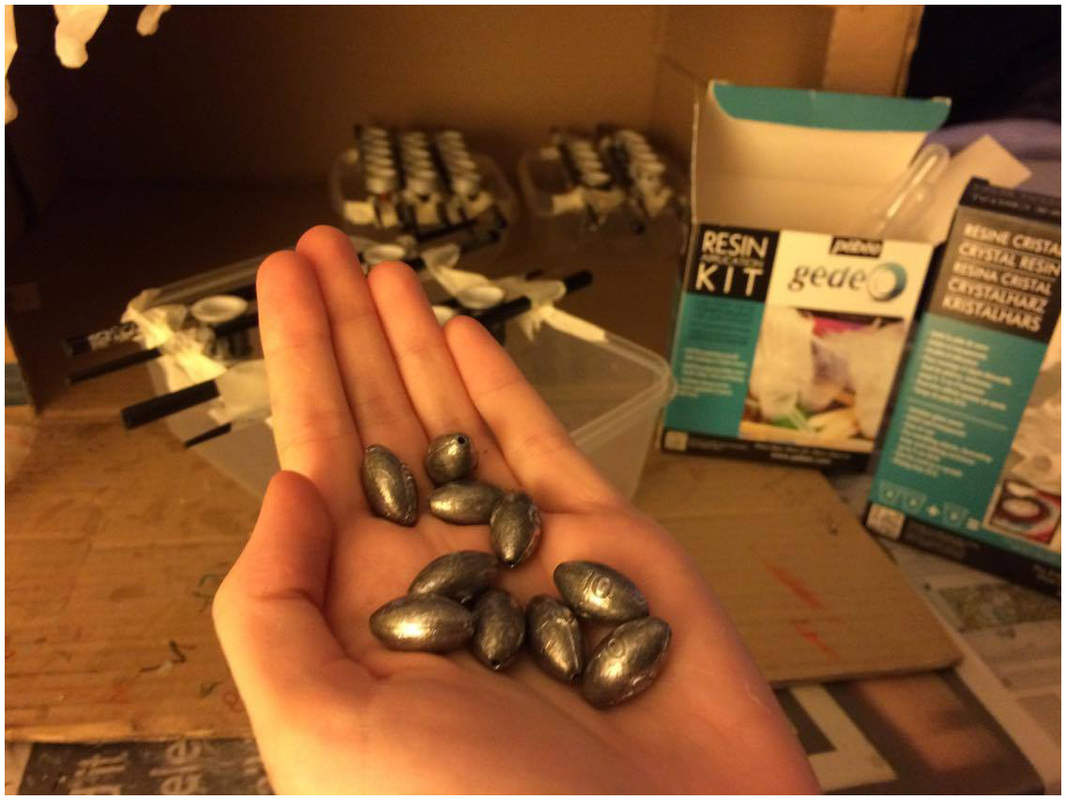
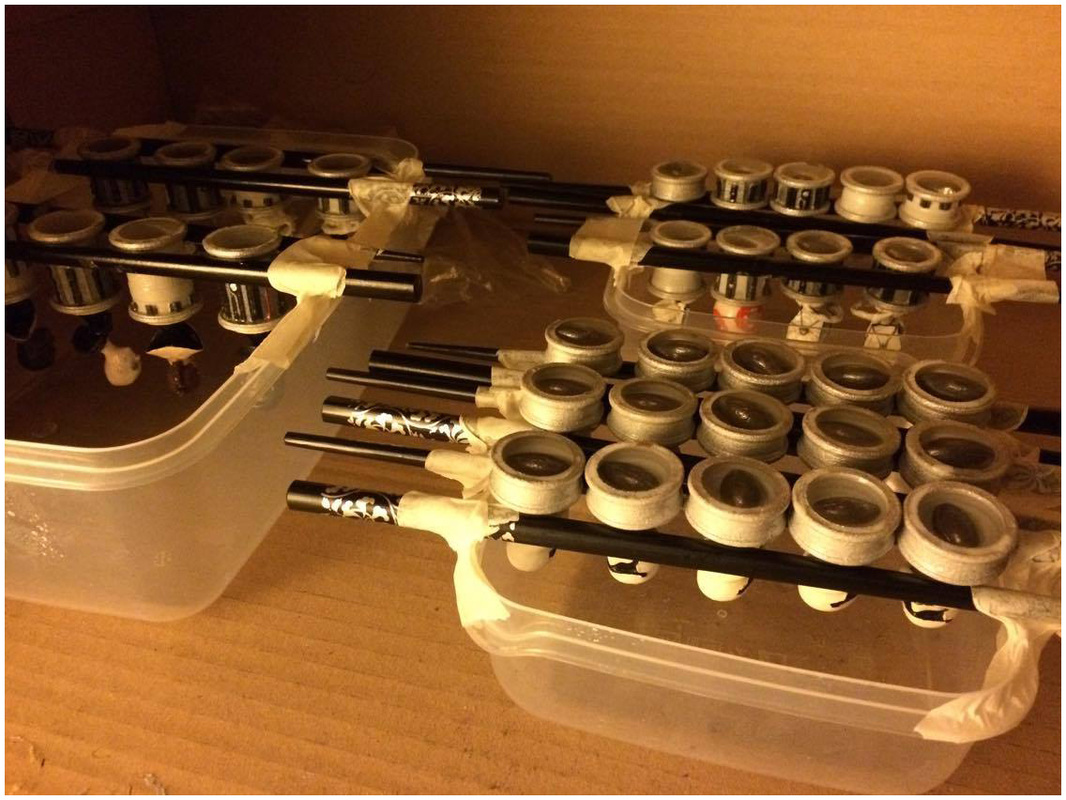
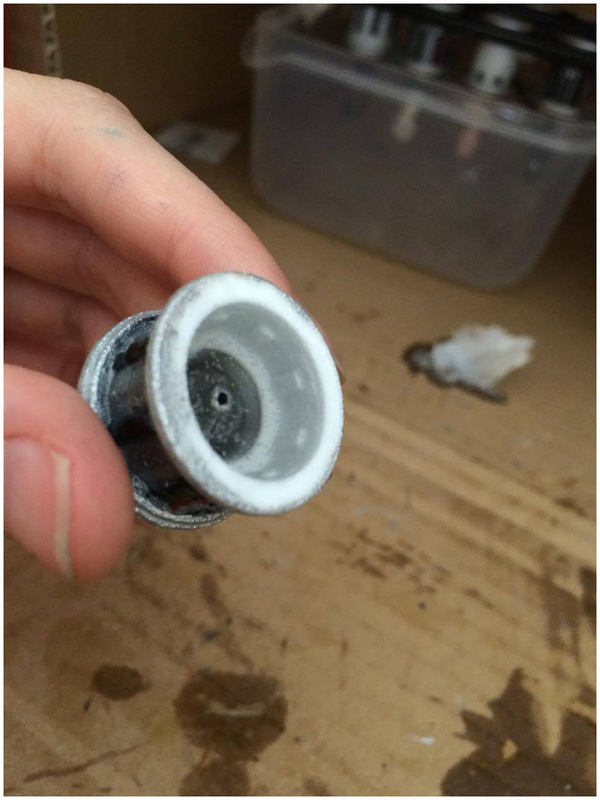
I then needed to prepare the pieces to have their hollow insides filled with resin and 10g fishing weights. To do this I got some tupperware containers and chopsticks and used masking tape to hold them in place firmly. The shape of the pieces bases allowed me to hang them upside down in rows between two chopsticks to set. I hadn’t used resin before so this was totally new to me. It was really messy and I’m so glad the crystal resin I ordered was supplied with pipettes to distribute the liquid. The fishing weights were dropped in to add extra weight. Each model had a fishing weight placed inside and resin poured up to the top (bottom) of the chess piece. I left them overnight to set which was about 14 hours, not the 24 fully dry time given (it said surface dried in 12 hours on the pack) I was able to touch them and get them out of their chopsticks by then. I had a three or four casualties as a result of stray resin drops sticking to the chopsticks or other pieces which I had to sever with a veggie knife and repaint and gloss afterwards. The pieces felt very satisfying to hold after they were weighted.
Almost done! Last task to do was to cut felt circles (black for darkside, white for lightside of course) for the bottoms and stick them on. I also cut out and stuck on the Sticker You stickers I had ordered to the bottoms to identify the role of each piece just in case. And that was it! I had made a Star Wars chess set! Woo!
Almost done! Last task to do was to cut felt circles (black for darkside, white for lightside of course) for the bottoms and stick them on. I also cut out and stuck on the Sticker You stickers I had ordered to the bottoms to identify the role of each piece just in case. And that was it! I had made a Star Wars chess set! Woo!

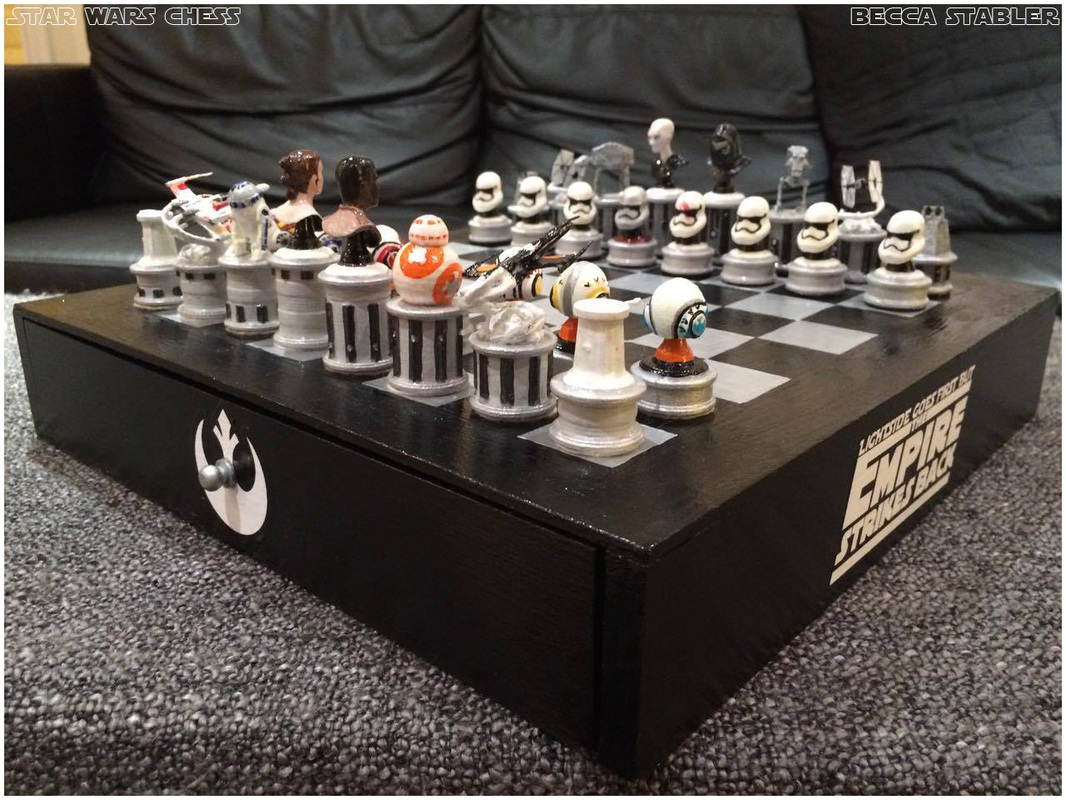
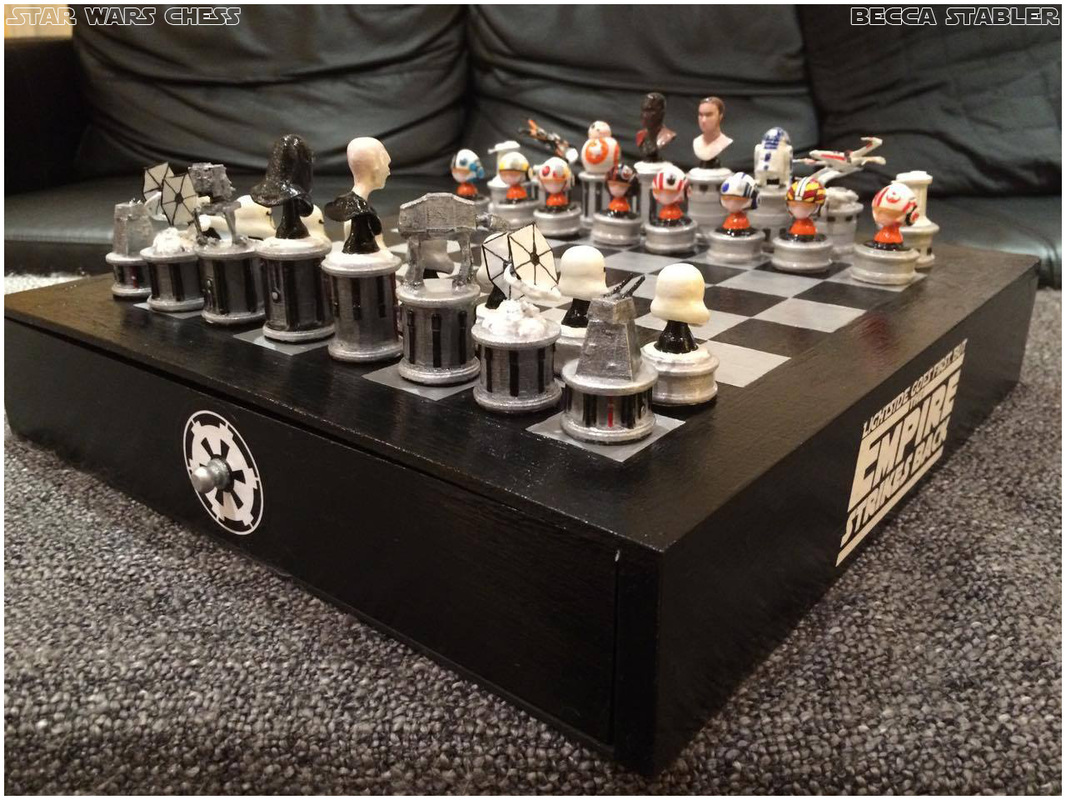
The final result!
Here are some photos of the final thing taken on my iPhone before I gave it to Chris on his birthday. After he was given it he took some photos with his camera with different lighting so I've put those in too. Enjoy :)


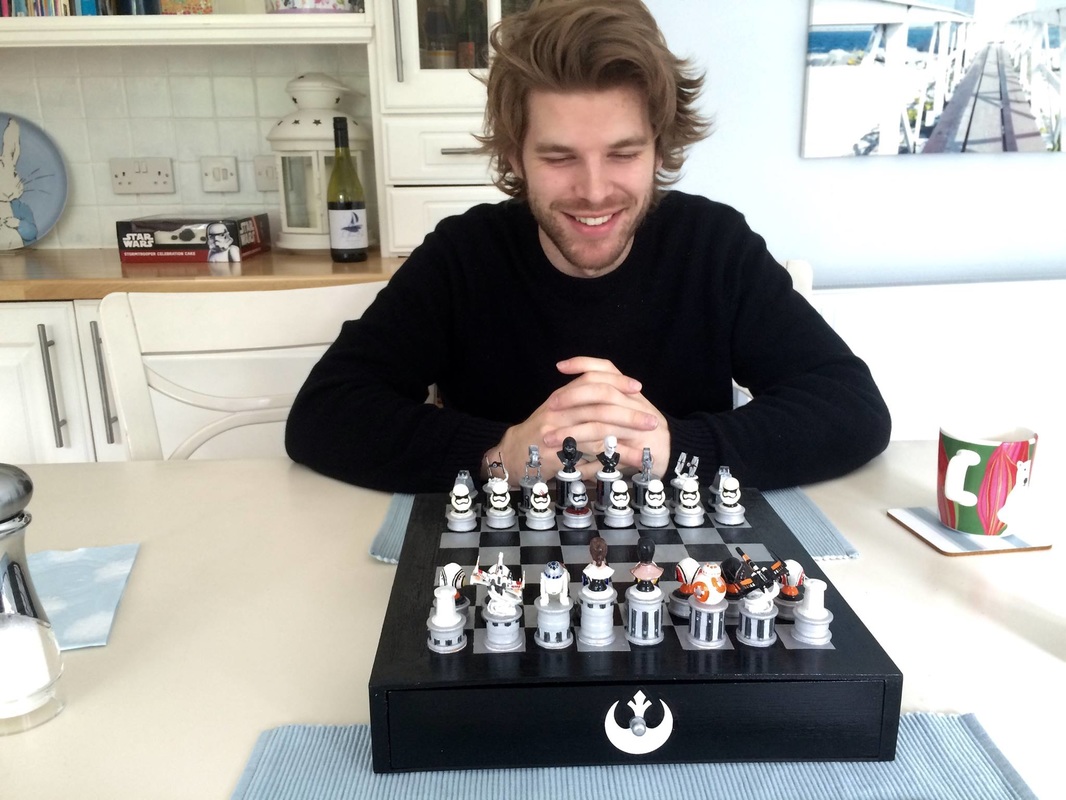
He loved it :D
May the force be with you. The End.


 RSS Feed
